You are here: Foswiki>Applications Web>AppHowToMain>AppHowToProjectSetup (12 Jan 2023, AndreasSchaller)Edit Attach
Creating a new Maven Project
In Eclipse Project Explorer
-
Right click -> New -> Other - Select
Maven -> "Maven Project" - Optionally assign it to a working set
- On the "Select an Archetype" page choose "GSI catalog" and filter
"csco"->choose"csco-java-fx-template"- If no "GSI catalog" is available check the required steps of the AppHowToEclipseConfiguration#Always_needed and add it
- Set the Group Id, Artifact Id and property values according to our ArtifactNamingGuideline also see AppGuidelinesNamingGuideline and AppHowToJavaPackageNaming
- Finish
Adjust the pom.xml file
- Provide a description of your project if you have missed to edit the archetype property (In
<description>) - Adjust the URL to your documentation webpage
- Adjust the properties
bundle.mainClassandgit.organization(the organization of your git project in https://git.acc.gsi.de/ if present)- In the following section AppHowToProjectSetup#Create_the_gitea_project you can see how to create a git project afterwards - the organisation can also be you gitea username
- The section
scmshould not be modified
<properties>
    <!-- Adjust this to point to your main class -->
    <bundle.mainClass>please.set.the.bundle.properties</bundle.mainClass>

    <!-- Adjust this to point to the Git Organisation name where you want to share the project -->
    <git.organization>fcc-applications</git.organization>
</properties>

<scm>
    <connection>scm:git:${git.view.url}/${git.organization}/${project.artifactId}.git</connection>
    <developerConnection>scm:git:${git.dev.url}/${git.organization}/${project.artifactId}.git</developerConnection>
    <url>${git.view.url}/${git.organization}/${project.artifactId}/commits/branch/${scmBranch}</url>
    <tag>HEAD</tag>
</scm>
- Adjust the URL to your continuous integration location for the project
- Adjust the URL to your projects bugtracker
- Add yourself as developer in the
<developers>part (change URL to your persons web page)- provide the correct roles of all developers since these roles are used to generate documentations
- possible roles are: owner, architect, developer, release engineer and tester
- Replace dependencies by e.g.
<dependencies>
    <dependency>
        <groupId>de.gsi.fcc.commons</groupId>
        <artifactId>common-widgets</artifactId>
        <version>17.0.0</version> <!-- look for newer version -->
    </dependency>
    <dependency>
        <groupId>de.gsi.fcc.commons</groupId>
        <artifactId>common-dependencies</artifactId>
        <version>17.0.0</version> <!-- look for newer version -->
    </dependency>
</dependencies>
If your project needs some configuration properties, specify them using How To Configuration (more dynamically).
Checklist for new Applications
- Use the Standard GSI Frame to guarantee a common look: GsiFrame
- System Properties are stored in the common-config repository: Configuration / Startup Options
- Use diagnostic Logging: How to logging
- Use the language translator to internationalize your Application: Language Selector
Build your project
-
Right click on project -> run as -> maven build ... - use goals
"clean package"to just ensure your project can be build and to test it locally
or
use goals"compile exec:java"to run the newly created application
or
use goals"clean install"to install your project to your local maven repository and build zip file for rollout (ensure the correct codebase is set!)
or - use
"clean deploy"to deploy your project to the nexus
Next Steps
Rename the main class and controller
Once you feel safe enough with the project setup you should rename the main method and controller to the actual name of the application. Using our archetypeTemplateApp as starting point we want to rename it for example to BeamApp.You will have to rename or edit the selected files in the screenshot.
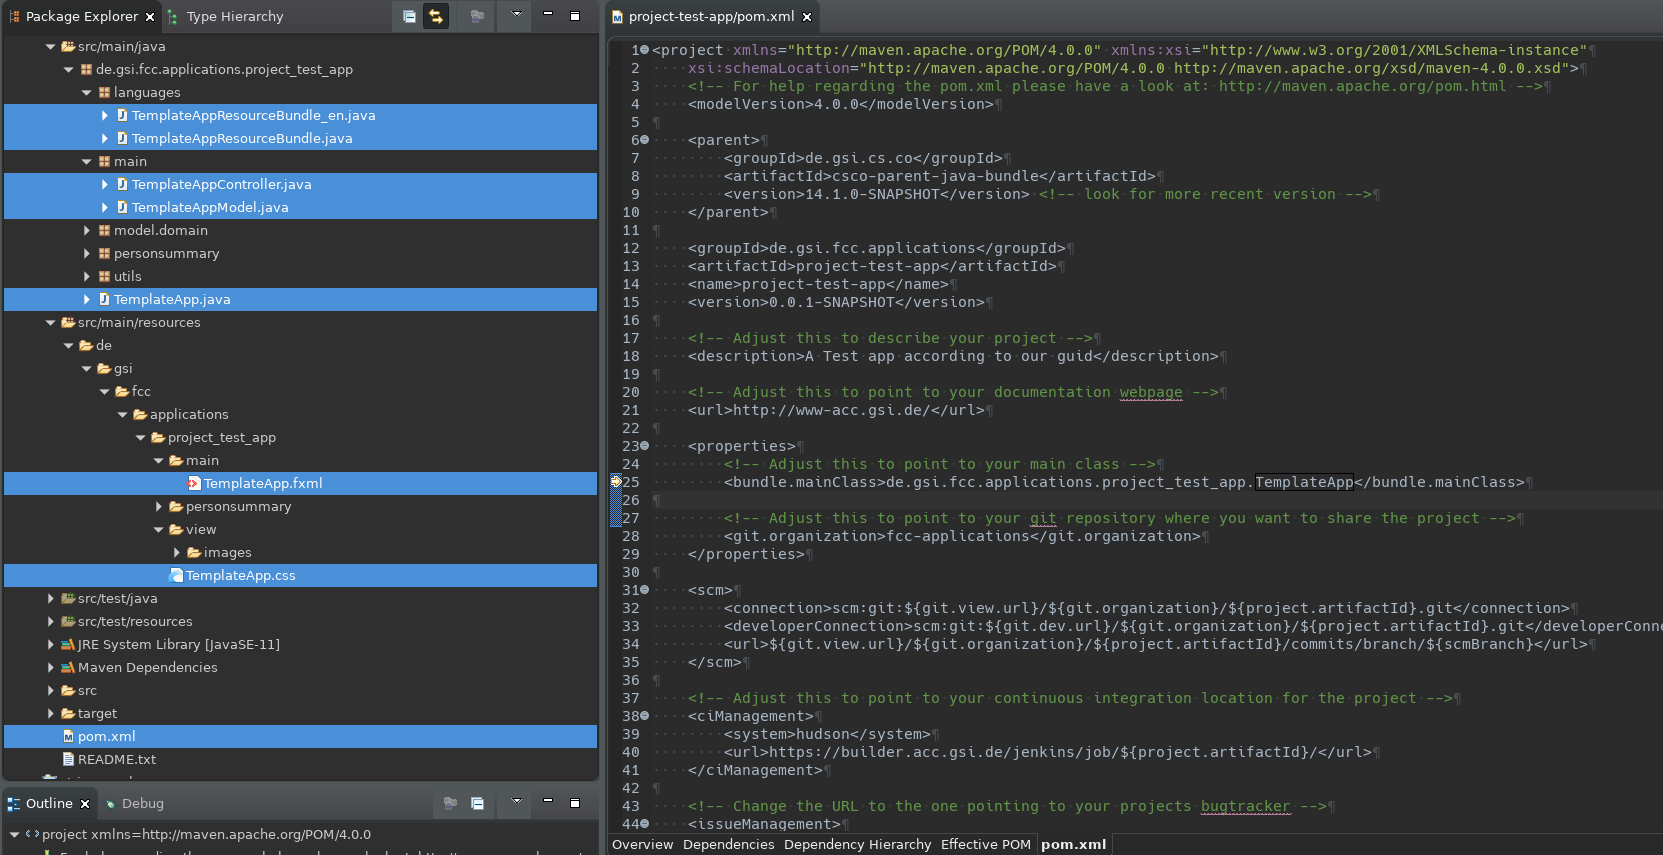
- Make sure the project is in a compiling state without errors (see eclipse "Problems" view)
- Edit
pom.xmland change the last part ofbundle.mainClassfrom TemplateApp toBeamApp - Right click on
TemplateApp.javathen chooseRefactor -> Rename...enterBeamApp.javaand confirm the following information dialogs withnextorfinish- (Shortcut
Alt+Shift+Rif you feel comfortable using it)
- (Shortcut
- Open
TemplateApp.javaand changeAPP_TITLEto"Beam App"and APP_STYLESHEET to"BeamApp.css" - Rename the following files in the same way using the
Refactor -> Rename...function (you can use the shortcutCtrl+Shift+Rto find the files)-
TemplateAppResourceBundle_en.java->BeamAppResourceBundle _en.java -
TemplateAppResourceBundle.java->BeamAppResourceBundle.java -
TemplateAppController.java->BeamAppController.java -
TemplateAppModel.java->BeamAppModel.java -
TemplateApp.fxml->BeamApp.fxml -
TemplateApp.css->BeamApp.css
-
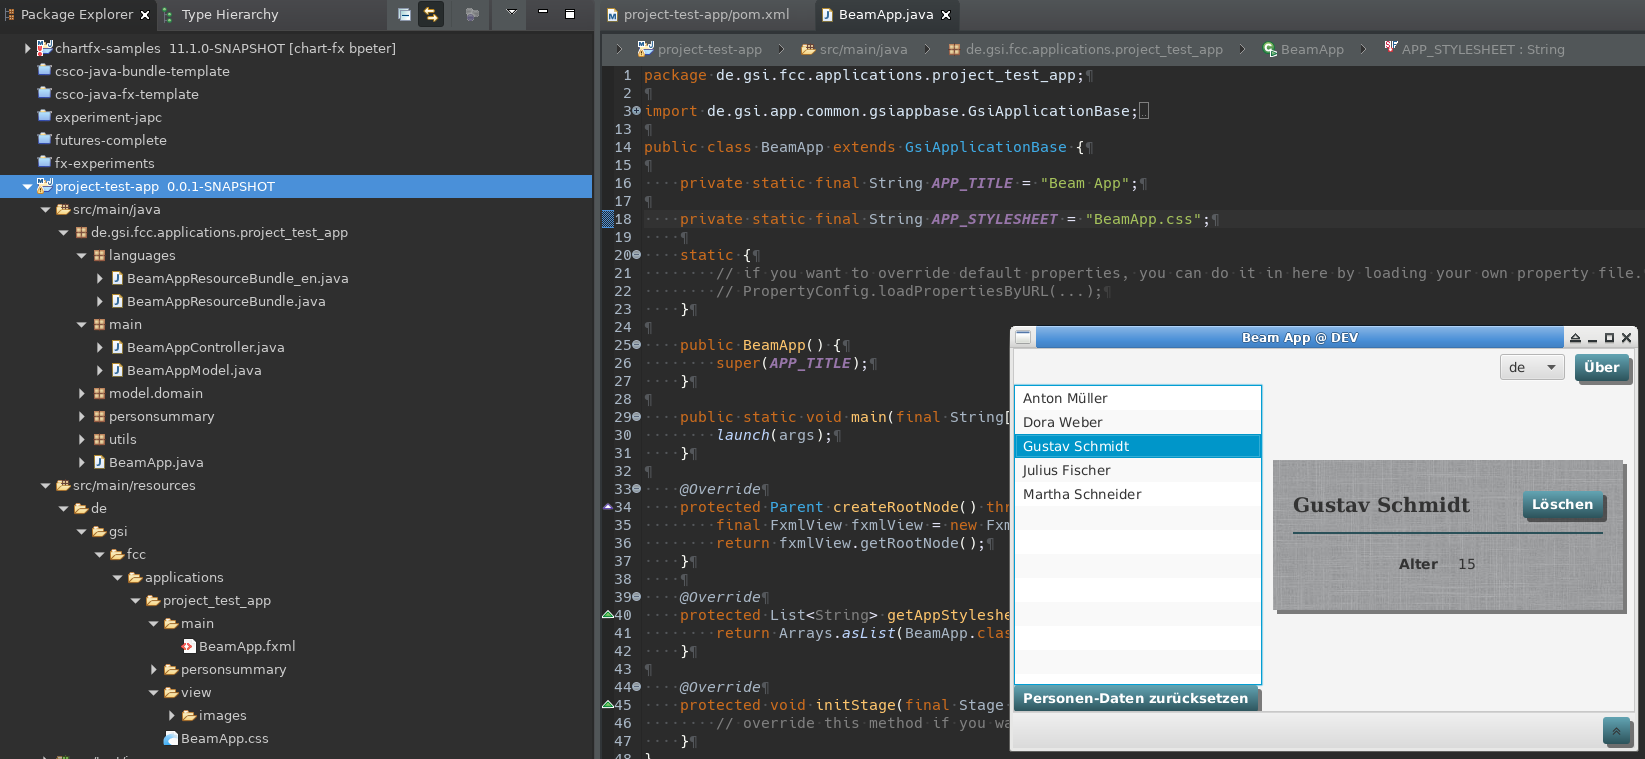
- Done. If everything went well there should be no "Problems" and you can still run the app by clicking on the project name in the "Package Explorer", select
Run As -> Maven build...then Goals: "clean compile exec:java" -> Run
Creating a git project and upload your code
Please make sure to read AppHowToGitInEclipseForBeginners at least up to and including 2.1. We will create a project in our personal git organisation which can later be move to one of the bigger organisations like fcc-applications or fcc-commons.Create the gitea project
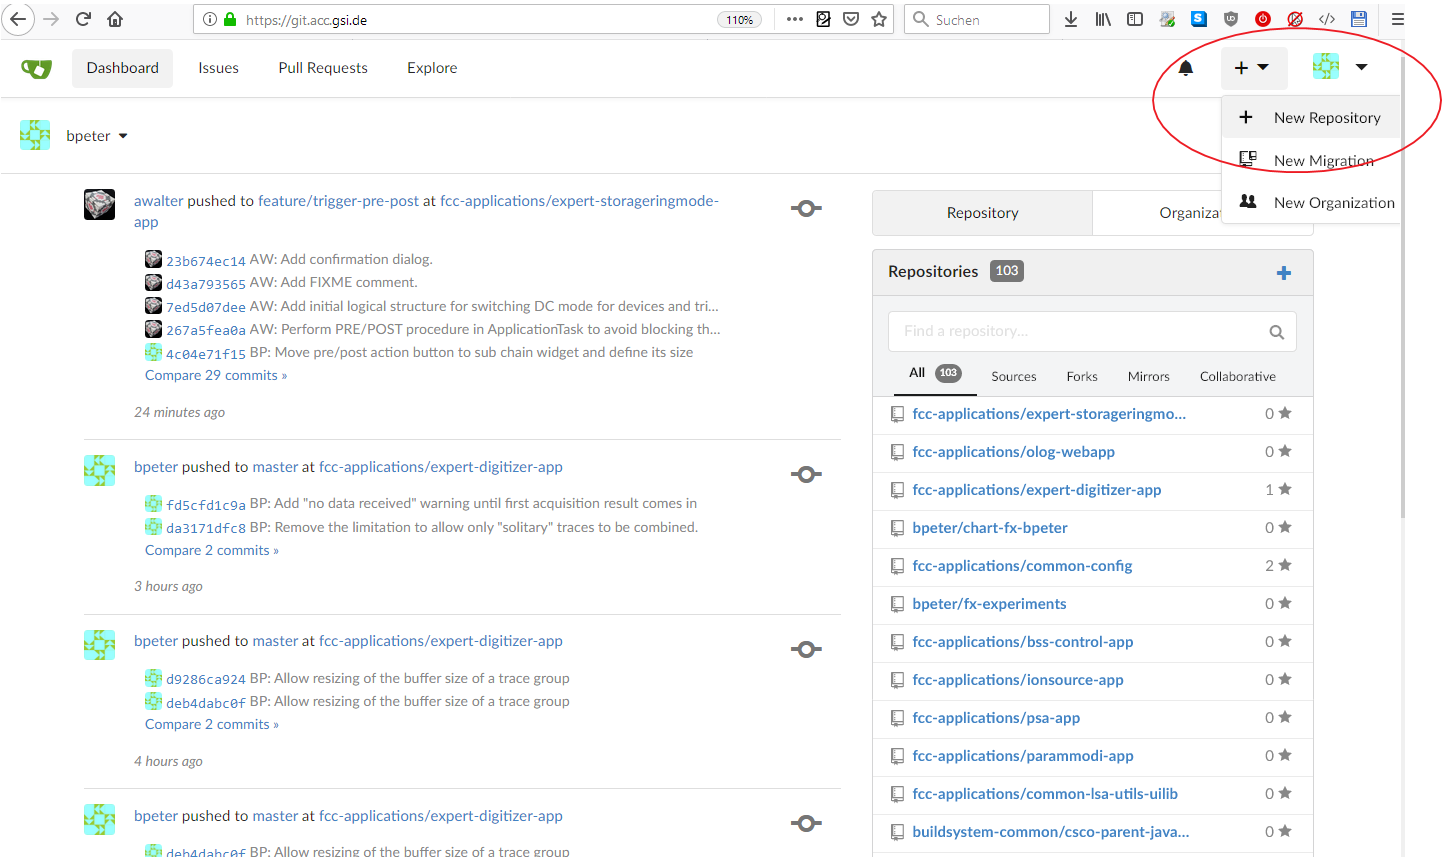
Visit https://git.acc.gsi.de/ and Please follow the screenshots.1. Chose new repository from the "+" menu
2. Enter you project name and information
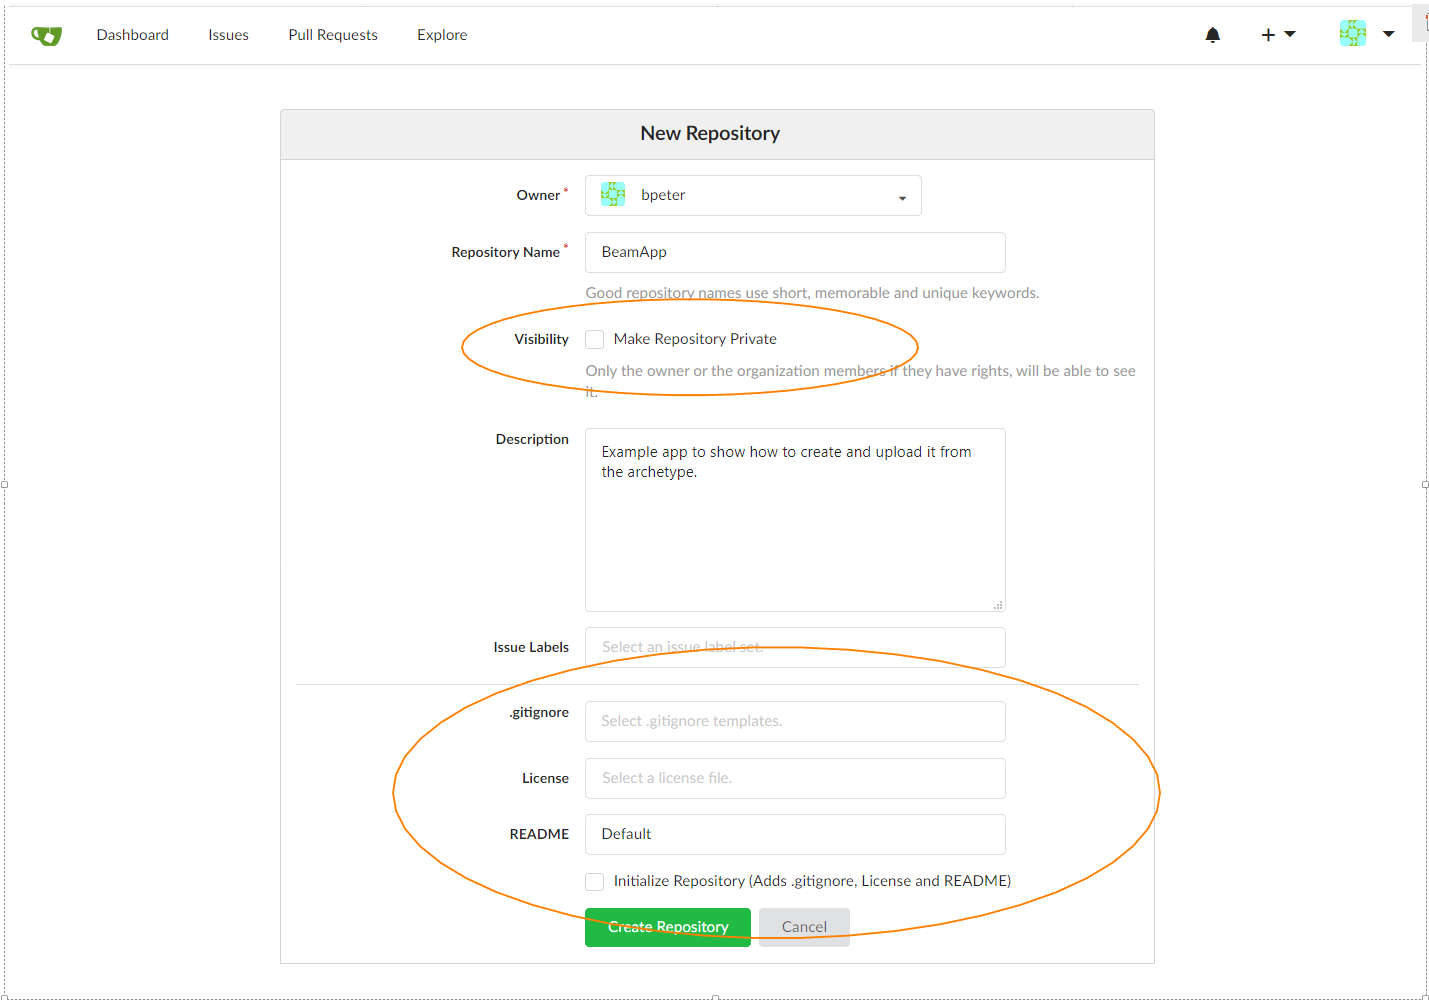
- Owner: You name
- Chose a repository name that resembles or even is the same as the maven artifact name
- Private repository is only if you want to hide the project, none of your collegues will be able to see the project
- Leave the gitignore, license and especially the "initialize repository" option empty. We already have code that we want to upload and don't want do get any conflict
- Hit "Create Repository"
3. Repository created, copy URL
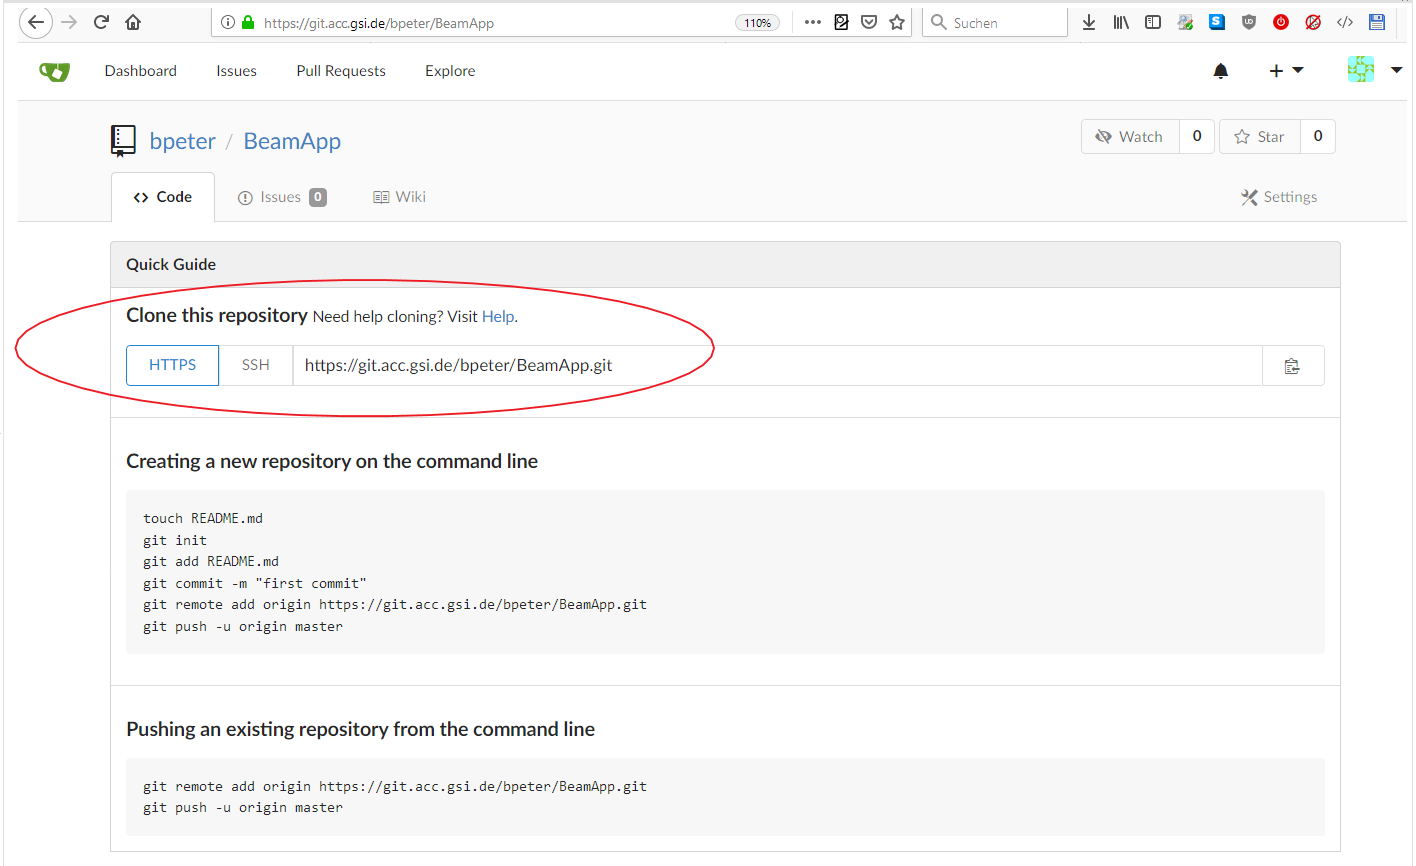
- Repository created successfully - make sure to copy the marked http repository URL.
4. Initialize the local git repository
Now we have to do some command line work. Open a bash shell and navigate to the source files of your project. (To get the path, in Eclipse: selectProject -> Properties -> Location might help you)
Enter the following commands from the main project directory (were pom.xml is)
cd DIRECTORY_OF_THE_PROJECT
git init
# download a default gitignore file that will prevent eclipse project files from being uploaded
wget https://git.acc.gsi.de/buildsystem-common/csco-java-fx-template/raw/branch/main/.gitignore
# Adjust the complete URL to the previously copied one
git remote add origin https://git.acc.gsi.de/REPLACE_COMPLETE_WITH_THE_URL_YOU_HAVE_COPIED_BEFORE
# Add and commit all these changes with the following commands
git add -A
git commit -m 'Initial commit'
# We will then push the changes using eclipse in the next step
5. Push the repository using eclipse
- Now we switch back to eclipse, select our project in the repository explorer and do a
"-> refresh"or hitF5while the project is selected - Select
Team -> Push Branch "master"...- (highlighted blue in the screenshot below)
- if you only have the options "Apply patch", "Share Project", and "Share Projects", choose "Share Project", select GIT and finish, repeate step 2
- There might be a prompt for your local
keystorepassword, enter it or cancel thekeystoredialog - Click on
PreviewandPushin the following dialog pages
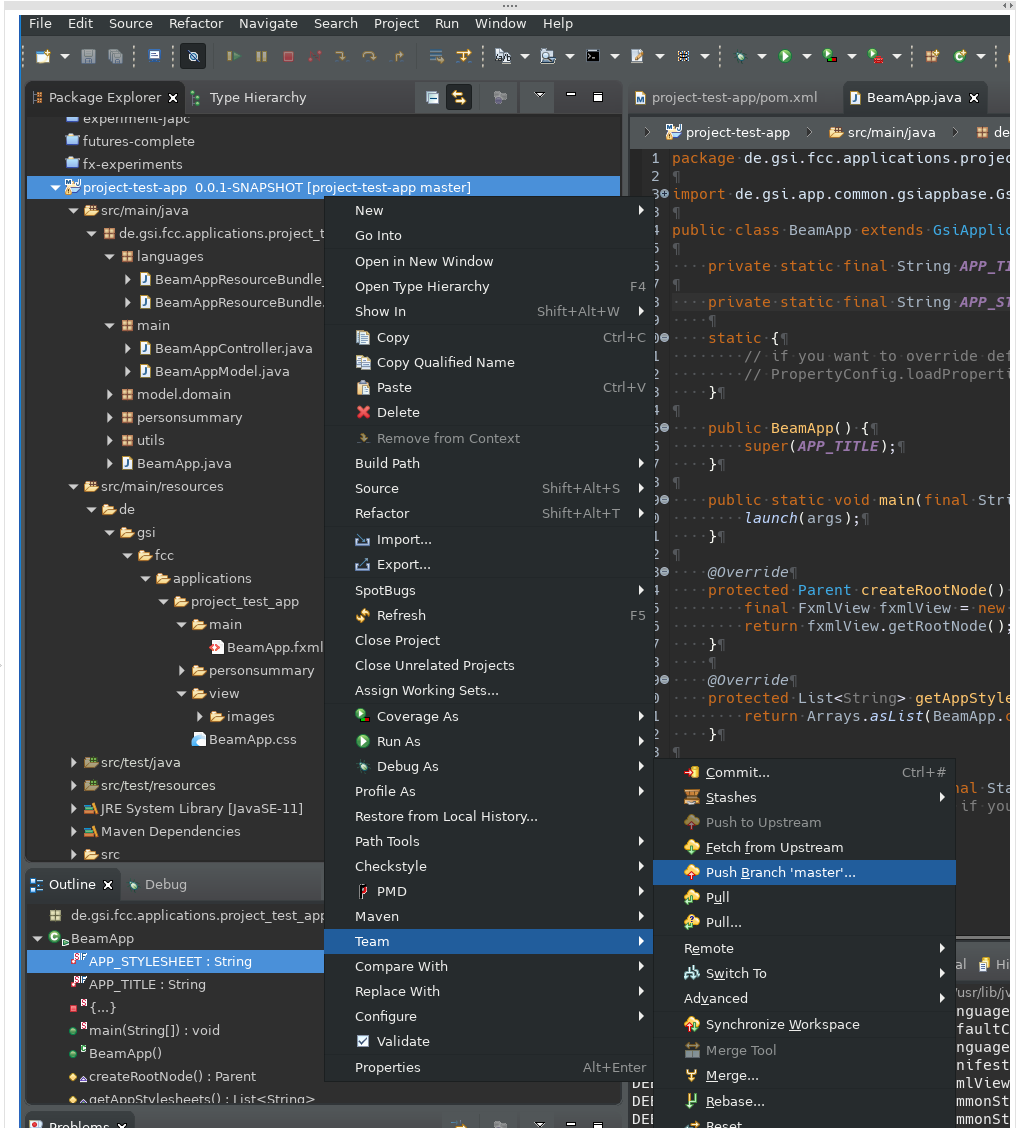
6. Success
You can see an entry in your eclipse "history" view now and if you refresh you gitea project page.
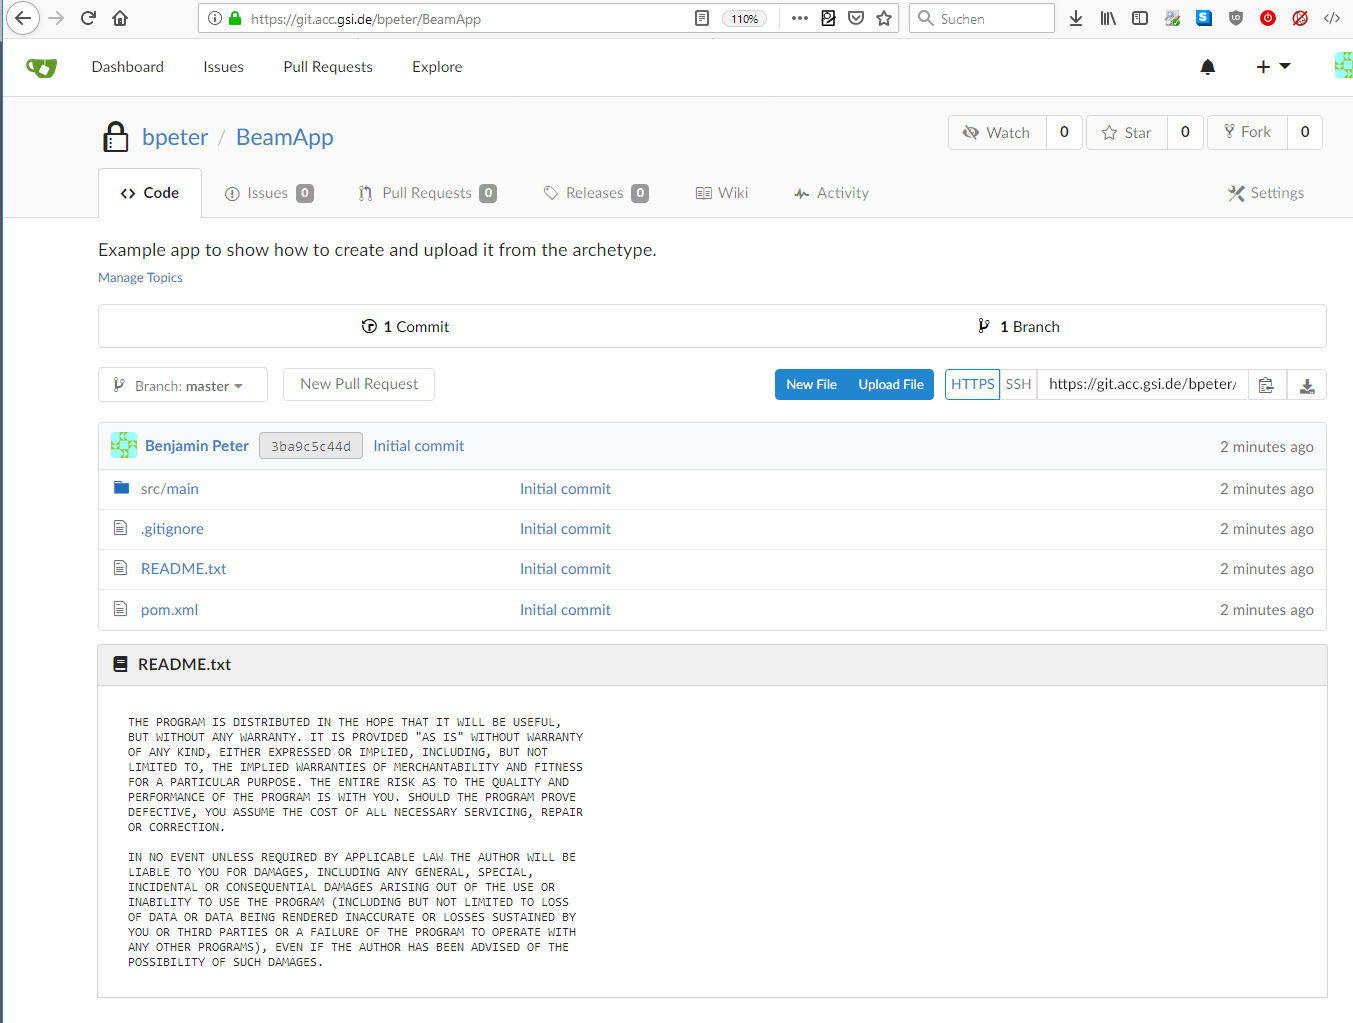
See also
-- AndreasSchaller - 23 Sep 2014| I | Attachment | Action | Size | Date | Who | Comment |
|---|---|---|---|---|---|---|
| |
new-project-rename-after.png | manage | 249 K | 28 Jan 2020 - 15:10 | BenjaminPeter | |
| |
new-project-rename.png | manage | 223 K | 28 Jan 2020 - 14:49 | BenjaminPeter |
Edit | Attach | Print version | History: r18 < r17 < r16 < r15 | Backlinks | View wiki text | Edit wiki text | More topic actions
Topic revision: r18 - 12 Jan 2023, AndreasSchaller
 Copyright © by the contributing authors. All material on this collaboration platform is the property of the contributing authors.
 Ideas, requests, problems regarding Foswiki? Send feedback


