You are here: Foswiki>Applications Web>AppHowToMain>AppHowToEclipseConfiguration (16 Jan 2024, JonasPforr)Edit Attach
Eclipse Configuration
The official Eclipse version"2022-12" is already installed
On the Rocky 9 Cluster (asl751 - asl755), a Java Development Kit (OpenJDK 17) is already installed. During development keep in mind that the cluster is configured for 64bit (OS, Java, etc.). Typing "echo $JAVA_HOME" in a console on the cluster should reveal the location of the java installation.
Launching Eclipse
To start Eclipse with the default plugin customization / preferences provided by APP, you can:- Start Eclipse with the command line option
-pluginCustomization /common/usr/cscoap/opt/eclipse/2022-12/plugin_customization.ini
- Use our startup script:
- for members of groups cscoap or lsa: simply
eclipse-app
- for non-members of cscoap/lsa:
-
/common/usr/cscoap/bin/eclipse-app
- Optional: If you want to be able to use the short command, create a symlink to our startup script in your personal bin folder:
ln -s /common/usr/cscoap/bin/eclipse-app ~/bin/eclipse-app
-
- for members of groups cscoap or lsa: simply
$HOME/workspaces/). Otherwise, you will be prompted to choose a workspace by the Eclipse launcher. - open your workspace at the specified path:
eclipse-app /path/to/your/workspace/
- open your workspace at $HOME/workspaces/workspace_name:
eclipse-app workspace_name
- prompt to choose a workspace:
eclipse-app
Needed Manual Eclipse Configuration
- Go to Window → Preferences → Maven → Installations
- here you press the "Add…" button and choose the maven setup located at
/usr/share/maven
- here you press the "Add…" button and choose the maven setup located at
- Go to Window → Preferences → Java → Code Style → Code Templates
- choose Comments → Types → Edit → change
${user}to your full name (e.g. Max Mustermann)
- choose Comments → Types → Edit → change
- Go to Window → Preferences → Java → Editor → Templates
- choose "@author" → Edit → change
${user}to your full name (e.g. Max Mustermann)
- choose "@author" → Edit → change
- Go to
Window → Preferences → Maven → Archetypes- Add remote catalog: "GSI catalog": https://artifacts.acc.gsi.de/repository/default/
- (Search Tag: archetype)
- During development you might have a lot of error and problem reports in the "Problems" view. You should group them by the problem type:
- In
"Problems"view, open"view menu"(the down arrow button on the upper right of the view)-
Group by → Java Type Problem -
Show → Errors/Warnings on Selection(or Project, whatever you prefer)
-
- In
Specific Eclipse configuration for LSA projects only
For existing code in projects that are shared between CERN and GSI (i.e. all projects that are not GSI-specific), only an agreed-upon subset of formatting rules may be applied. Practically, this means that save actions in Eclipse currently have to be manually deactivated and formatting must be triggered manually and only on edited sections. The steps to configure this are as follows:- For all projects that are shared between CERN and GSI please do the following (See the
cern-reporepository https://git.acc.gsi.de/lsa/cern-repo for the list of projects)
- Right click the project in
"Package Explorer"and select"Properties". - Navigate to
"Java Editor" → "Save Actions" - Activate
"Enable project specific settings". - Deactivate
"Perform the selected actions on save".
- Right click the project in
"Clean up" feature is configured to behave accordingly. What you can do is: - To apply GSI's formatting standard to the whole class you added, right click in the Java editor window and choose
"Source" → "Clean Up".- in the next dialog choose the
ACOAPP-CleanupProfile
- in the next dialog choose the
"Clean Up" feature. To do this - Go to
Window → Preferences → "General" → "Keys"- filter by
"clean up"(mind the space) - assign a hotkey of your choice by pressing the desired key combination in the
"Binding"input field (one valid option should beSHIFT + CTRL+ D(as there are no other commands assigned to thishotkey), but that's up to your personal preferences)
- filter by
Git
We use Git with the pre installed EGit plugin. See AppHowToGitConfigure to set up Git on the development cluster. See AppHowToGitInEclipseForBeginners on how to get started with the plugin in eclipse.Code Formatting
If you have any"ascii-art" comments in your code and the formatter would make them unreadable you can add the "// @formatter:off" comment at the beginning of your comment and the "// @formatter:on" tag at the end of your comment. This will deactivate the formatter between the two tags. BUT: Avoid excessively use of this feature!
If you have line breaks in your code that help understanding what is going on (for example when building java stream chains). You can use an empty comment start "//" at the end of the line to prevent the line break from being deleted. (future eclipse version might provide more formatting rules make these workarounds unneccessary)
Speed up Eclipse (Optional)
If you know, how your projects depend on each other, you can provide the "Build Order" so that eclipse can speed up the build process- Go to
Window → Preferences → General → Workspace → Build- rearrange you projects so that for each project there is no dependent project below in the list
- Go to
Window → Preferences → General → Appearance →- uncheck
"Enable theming" - uncheck
"Use round tabs"
- uncheck
- Go to
Window → Preferences → General → Startup and Shutdown →- uncheck all plug-ins except "Equinox Provisioning Platform Automatic Update Support".
- You may want some other plug-ins to be loaded on startup, depending on your work (e.g. Code Analysis UI for C/C++).
- Note that all the plug-ins are also loaded when you need them just in time.
- Go to
Window → Preferences → General → Editors → Text Editors → Spelling- uncheck "Enable spell checking"
Further Eclipse Configuration (Optional)
- Go to
Window → Preferences → General → Appearance → Label Decoration- deactivate all decorators that you do not use (e.g. you are a java developer you don't need all the c/c++ decorators)
- activate all Maven decorators (this will show the maven artifact version next to the project)
- Go to
Window → Preferences → General → Editors → Text Editors- activate
"Show print margin"and set"Print margin column"to120 - activate
"Show whitespace characters"
- activate
- Go to
Window → Preferences → General → Workspace- Set Workspace name to show in title bar to easily identify which workspace is currently opened if you have multiple workspaces
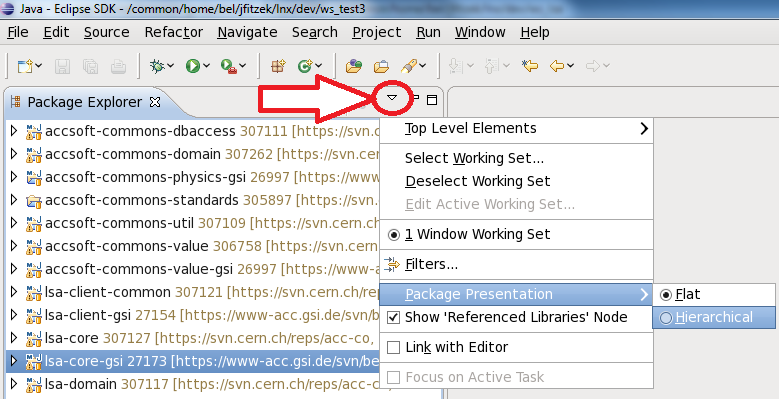
- Hierarchical view of source code:
Package Explorer → small drop down arrow on the upper right corner → package presentation → hierarchical
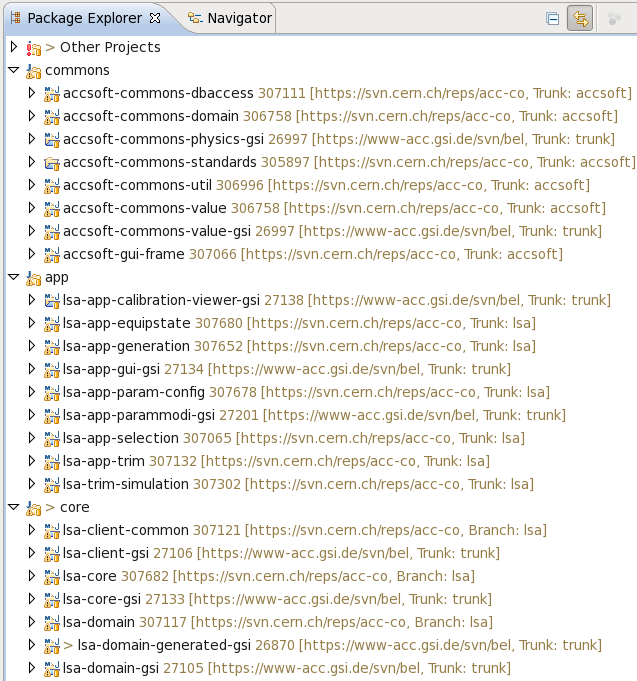
- Structuring of projects using working sets:
same small drop down arrow as shown above → configure working sets. Example configuration:
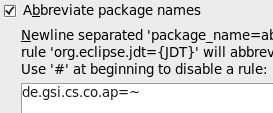
- Shorten displayed names of long package names:
(This will only effect the view in the "Package Explorer" (and all derived views) - other views and the file system won't be affected!)- Go to
Window → Preferences → Java → Appearance- activate
"Abbreviate package names"and write each package name you want to be displayed with a shorter name in a single line
- activate
- Go to
 will lead to:
 →
→ 
How eclipse works
Perspectives
Eclipse works with different Perspectives. Each perspective has its own specific task. The most used perspectives are"Java" or "Debug". Within this perspectives you can work on a specific task in your workflow, e.g. in the Java-Perspective you work on your code, whereas the Debug-Perspective provides additional information about the running applications, like Stacktrace, breakpoints and the current variable content.
In the upper right corner of eclipse you have an icon for each perspective after the generic perspective switcher icon.
Views
Each perspective contains at least one View. Views can be arranged next to each other or be tabbed at the same location. In the default Java perspective for example you have a "Package Explorer" View on the left, die "File Editor" View in the middle and the "Outline" View on the right. At the Bottom there are some Views like "Problems" or "Console" and so on.Recommended Plugins
The following plugins are recommended for our application development:- JavaFX SceneBuilder support
- Static code analyses
- Code style conventions
- Unit Test help
- JUnit test coverage
Already installed or obsolete
- UML Diagrams
- !ObjectAid (version: 1.1.11) → Installation currently does not work in eclipse-neon! 24. Oct 2016 (JF)
Installation
- Using Eclipse Marketplace:
- If Marketplace is not pre-installed, install it: https://marketplace.eclipse.org/content/eclipse-marketplace-client
- After installing Marketplace and restarting Eclipse, you can install most plugins by going to Help → Eclipse Marketplace… and search for the plugins by name.
- Or without Marketplace/if plugin is not available via Marketplace:
-
Go to Help → Install New Software… - Choose
Add…- Give a name describing the plugin
- Set the location URL you found on the plugins website
- You can also find download URLs on the marketplace sites, click on the orange download icon on the left side of the main part of the page
- Confirm with "Ok" and proced with futher installation steps that might depend on the plugin (also decide on trusting certificates)
-
Configuration
e(fx)clipse
Go to Window → Preferences → JavaFX and enter the following path to the SceneBuilder:/common/usr/cscoap/bin/SceneBuilderIf not already installed or update site missing see: https://marketplace.eclipse.org/content/efxclipse (Click on the question mark icon for update site)
Spotbugs (formerly Findbugs)
The Spotbugs configuration can be imported from here (right click → save as)
as follow: -
File → Import → General → Preferences- Choose the preference file
- ensure
"Import all"is checked
Checkstyle
For the Checkstyle plugin please use the maven configuration. Sadly there is no way to configure the plugin from maven so you have to configure it by yourself. Go toWindow → Preferences → Checkstyle - select
"New…"- choose type
"Remote Configuration" - set a name like
"ACOAPP Checkstyle Rules" - set the location https://git.acc.gsi.de/buildsystem-common/csco-parent-java/raw/branch/dev/src/site/checkstyle.xml
- set a description like
"ACOAPP Checkstyle Rules" - confirm with
OK
- choose type
- set the new config as default
- For each project: right click on the
project → choose Properties → Checkstyle- activate
"Checkstyle active for this project" - select the
"ACOAPP Checkstyle Rules" - confirm with
OK
- activate
"*/generated-sources/*" are ignored from Checkstyle, because many tests break a lot of rules to be functional.
PMD
For the PMD plugin please use the maven configuration. Sadly there is no way to configure the plugin from maven so you have to configure it by yourself. Go toWindow → Preferences → PMD → Rule Configuration - activate
"Use global rule management"- if you are asked to do a full rebuild answer with
"No"
- if you are asked to do a full rebuild answer with
- confirm with
OK - close eclipse
- in a terminal navigate to your workspace directory and run the following commands:
-
cd .metadata/.plugins/net.sourceforge.pmd.eclipse.plugin/ -
rm ruleset.xml -
ln -s /common/usr/cscoap/etc/pmd.xml ruleset.xml - Rule file can also be found here: https://git.acc.gsi.de/buildsystem-common/csco-parent-java/src/branch/dev/src/site/pmd.xml
-
- start eclipse
PMD → "Check Code", you also can check for duplicated code by choosing "Find Suspect Cut And Paste…".
To ignore PMD warnings on classes or methods you can add the @SuppressWarnings("PMD") annotation, on single lines of codes you can add the //NOPMD comment at the end of the line (see here).
Please note that all classes ending with "Test" are ignored from PMD, because many tests break a lot of rules to be functional.
See also:
How to set up own projectsMaven and Eclipse
| I | Attachment | Action | Size | Date | Who | Comment |
|---|---|---|---|---|---|---|
| |
Eclipse2019-03Preferences.epf | manage | 205 K | 10 May 2019 - 10:16 | AnnekeWalter | Eclipse 2019-03 Preferences (updated by AW) |
| |
EclipseMarsPreferences.epf | manage | 138 K | 26 Apr 2016 - 07:51 | AndreasSchaller | The eclipse mars preferences to import. |
| |
EclipseMarsPreferences_findbugs.epf | manage | 14 K | 07 Apr 2016 - 08:44 | AndreasSchaller | The Findbugs preferences to import for eclipse mars. |
| |
EclipseNeonPreferences.epf | manage | 165 K | 19 Oct 2016 - 06:47 | AndreasSchaller | Eclipse Neon Preferences |
| |
EclipseNeonPreferences_findbugs.epf | manage | 14 K | 19 Oct 2016 - 06:49 | AndreasSchaller | The Findbugs preferences to import for eclipse Neon |
| |
longDisplayedPackageName.jpg | manage | 15 K | 15 Apr 2014 - 10:28 | AndreasSchaller | |
| |
shortenDisplayedPackageNames.jpg | manage | 16 K | 15 Apr 2014 - 10:28 | AndreasSchaller | |
| |
shortenedDisplayedPackageName.jpg | manage | 13 K | 15 Apr 2014 - 10:28 | AndreasSchaller |
Edit | Attach | Print version | History: r113 < r112 < r111 < r110 | Backlinks | View wiki text | Edit wiki text | More topic actions
Topic revision: r113 - 16 Jan 2024, JonasPforr
 Copyright © by the contributing authors. All material on this collaboration platform is the property of the contributing authors.
 Ideas, requests, problems regarding Foswiki? Send feedback


