|
|
You are here: Foswiki>Applications Web>AppHowToMain>AppHowToGitInEclipseForBeginners (12 Jan 2023, AndreasSchaller)Edit Attach
Git In Eclipse for Beginners
This page describes how to use Git from within Eclipse in a beginners' version. Here the only scenario described is when a single developer works on a single project and explains how to perform push, pull and how to create the release branch. For everything more complicated, please refer to the Git in Eclipse for Experts HowTo .0. Getting familiar with Git
Before continuing, we recommend either watching a simple Git introduction "A Git crash course" by Brad Traversy (this is just a recommendation, there are lots of good Git introductions on the Internet). Or reading a very short guide: "git - the simple guide" by Roger Dudler, also available in German. In contrast to SVN, Git does not only work with the locally changed and the committed remote version of your file. Instead, in Git we work with three states (Pro Git Book, Introduction): The working copy that we modify in Eclipse, the files in the staging area /index/cache that are staged and therefore marked as relevant for the next commit and the history, i.e. the history of performed commits. These terms will be used in this How To. For further information about Git, please refer to the documentation or the Git references, that we recommend in the Git in Eclipse for Experts HowTo.1. Eclipse setup
1.1 Eclipse Config
If you did setup your Eclipse using a recentmkws (make-workspace) script, this step is not necessary and you can proceed to subsection 1.2.
The following Eclipse config needs to be done in order to use Git: - Window -> Preferences -> Team -> Git: set the "Default repository folder" to "${workspace_loc}/repos/git"
- Window -> Preferences -> Team -> Git -> Commiting: remove the checkbox at "Hard-wrap commit messages"
- Window -> Preferences -> Team -> Git -> Commiting: set both checkboxes at the "build process" section to true (JF: seems to be the default)
- Window -> Preferences -> Team -> Git -> History : set the checkbox at "All Branches and Tags" (JF: seems to be the default)
1.2 Opening Git related perspectives and views
To open the Git perspective which lets us e.g. clone repositories etc. just open Window -> Perspective -> Open Perspective -> Other -> Git.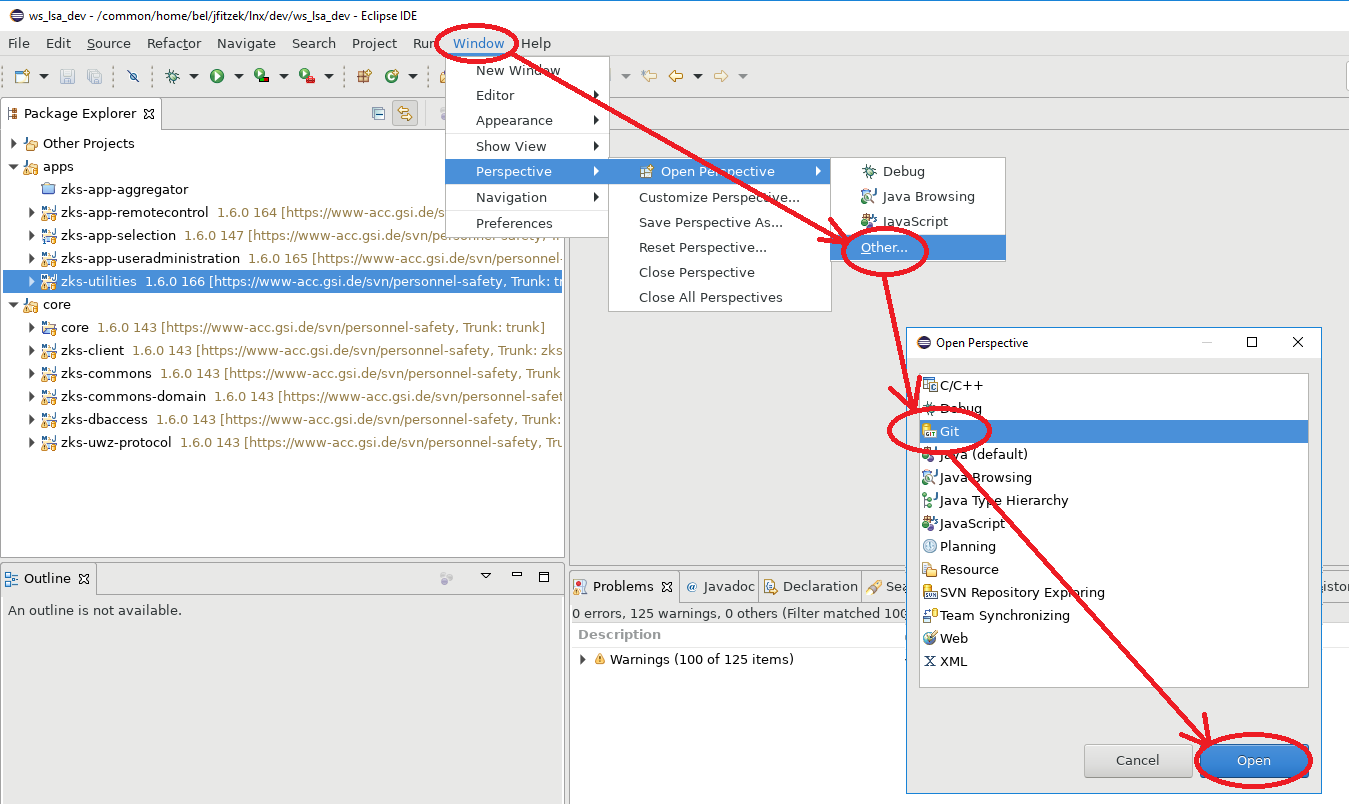 The other important views are:
 - Window -> Show View -> Other -> Team -> History: where you can see the commit graph
- Window -> Show View -> Other -> Git -> Git Staging: where you can index/stage your changes for commit and perform the commit

2. Clone your repository and import your project in Eclipse
2.1 ssh or https?
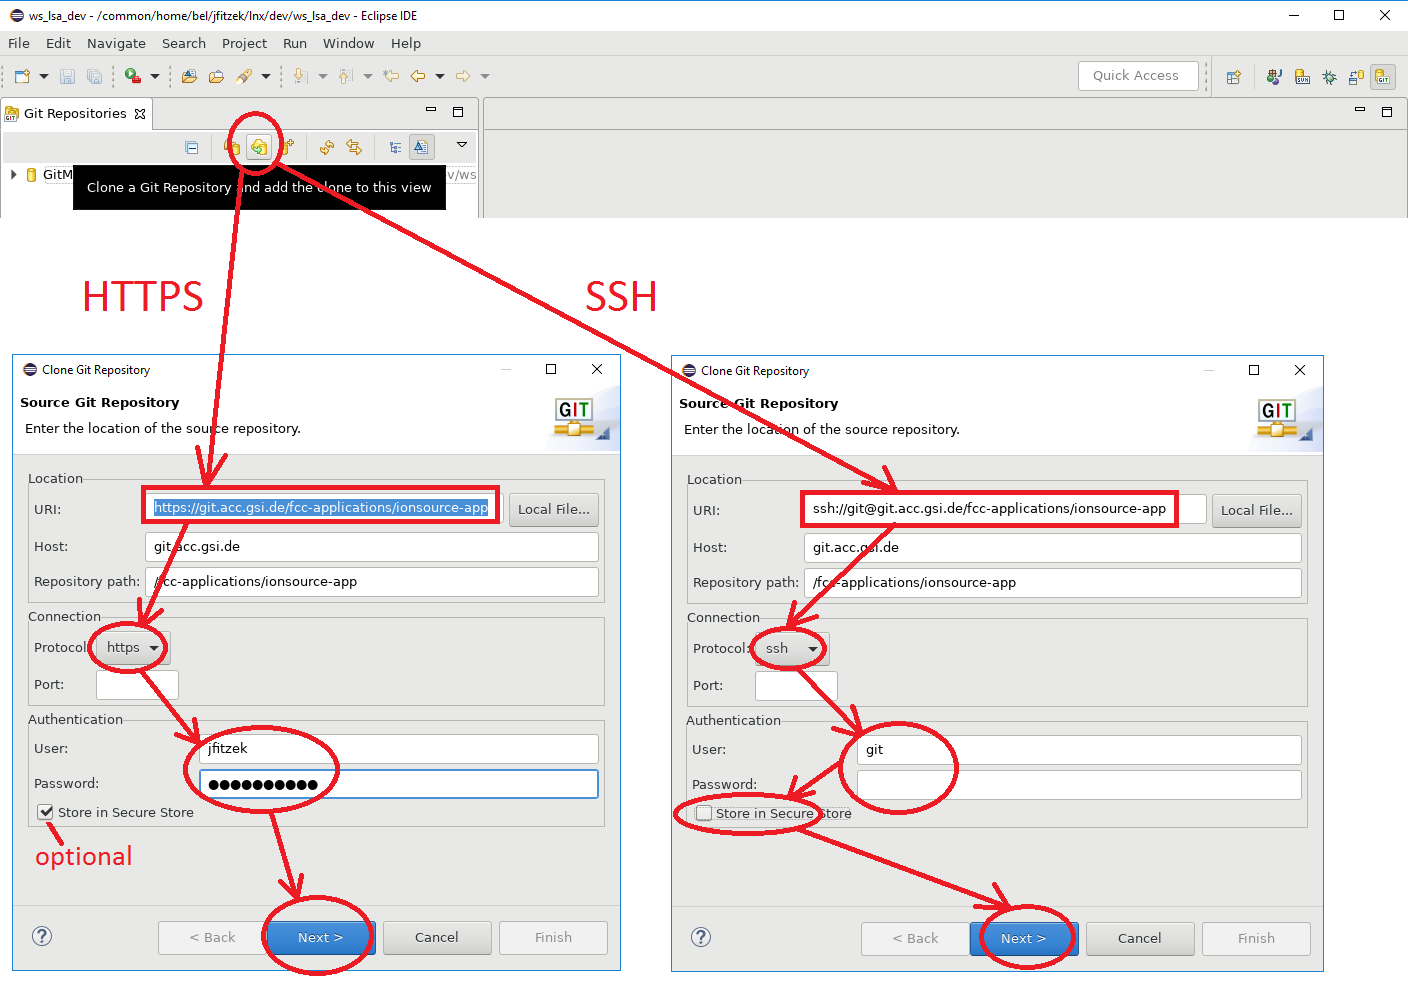
To start developing with a project from Git, we first have to create a clone of the corresponding repository. This can be done using https or ssh.
Working with https does not require any configuration and can be used right away. You have to enter your username and password, when interacting with the repository. We recommend it as a starting point, if you do not have a running ssh configuration so far.
To ease this process by using ssh and keys without having to enter your username and password all the times, you can first setup SSH. Then you can also use SSH here. When you already created ssh keys and if you did added your private ssh key to the ssh agent with ssh-add ~/.ssh/id_rsa successfully, then we recommend using ssh.
2.1.1 ssh tunnel when working from outside GSI
Another difference is reachability, if you want to work on your local machine from outside of the GSI network (for example using eduroam or working at home) you will need to use ssh connections. Since the gitea.acc.gsi.de domain is only reachable from within GSI, it is not possible to use git over https on external networks. On the other hand, ssh connections can easily be tunneled throughlx-login. This is not necessary when you are already using a remote desktop or in a shell from lx-pool or =asl7= machines.
You can add an ssh config to your user (on unix machines add the file ~/.ssh/config):
Host git.acc.gsi.de
    HostName git.acc.gsi.de
    User git
    ProxyJump gsi
Host gsi
    HostName lx-login.gsi.de
    User YOUR_lx-pool_USER_NAME
Using this config, you can access git from internal and external networks
2.1 Cloning the repository
Step 1: in the Git perspective, choose the button with the green arrow: "Clone a Git repository and add the clone to this view". Enter the URL of the repository and choose eitherhttps (ok for the beginning) or ssh (easier use, without entering too many passwords, better choice long-term). Depending on what you choose, either enter your real username/password in the case of https or enter git as username without password in the case of ssh.
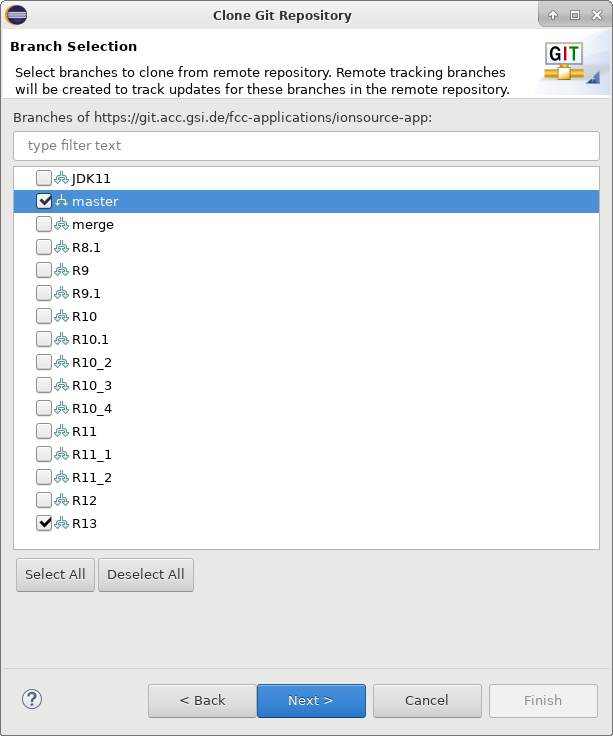
 Step 2: select the branches that you want to clone, e.g. master and optionally the latest release
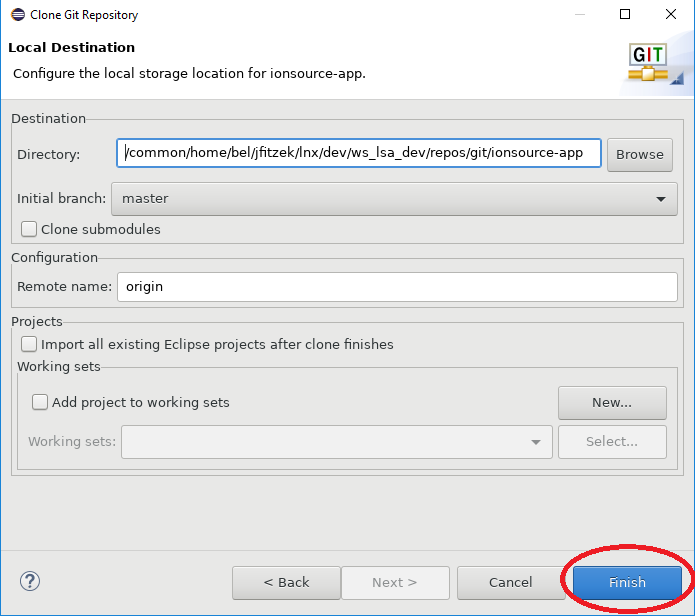
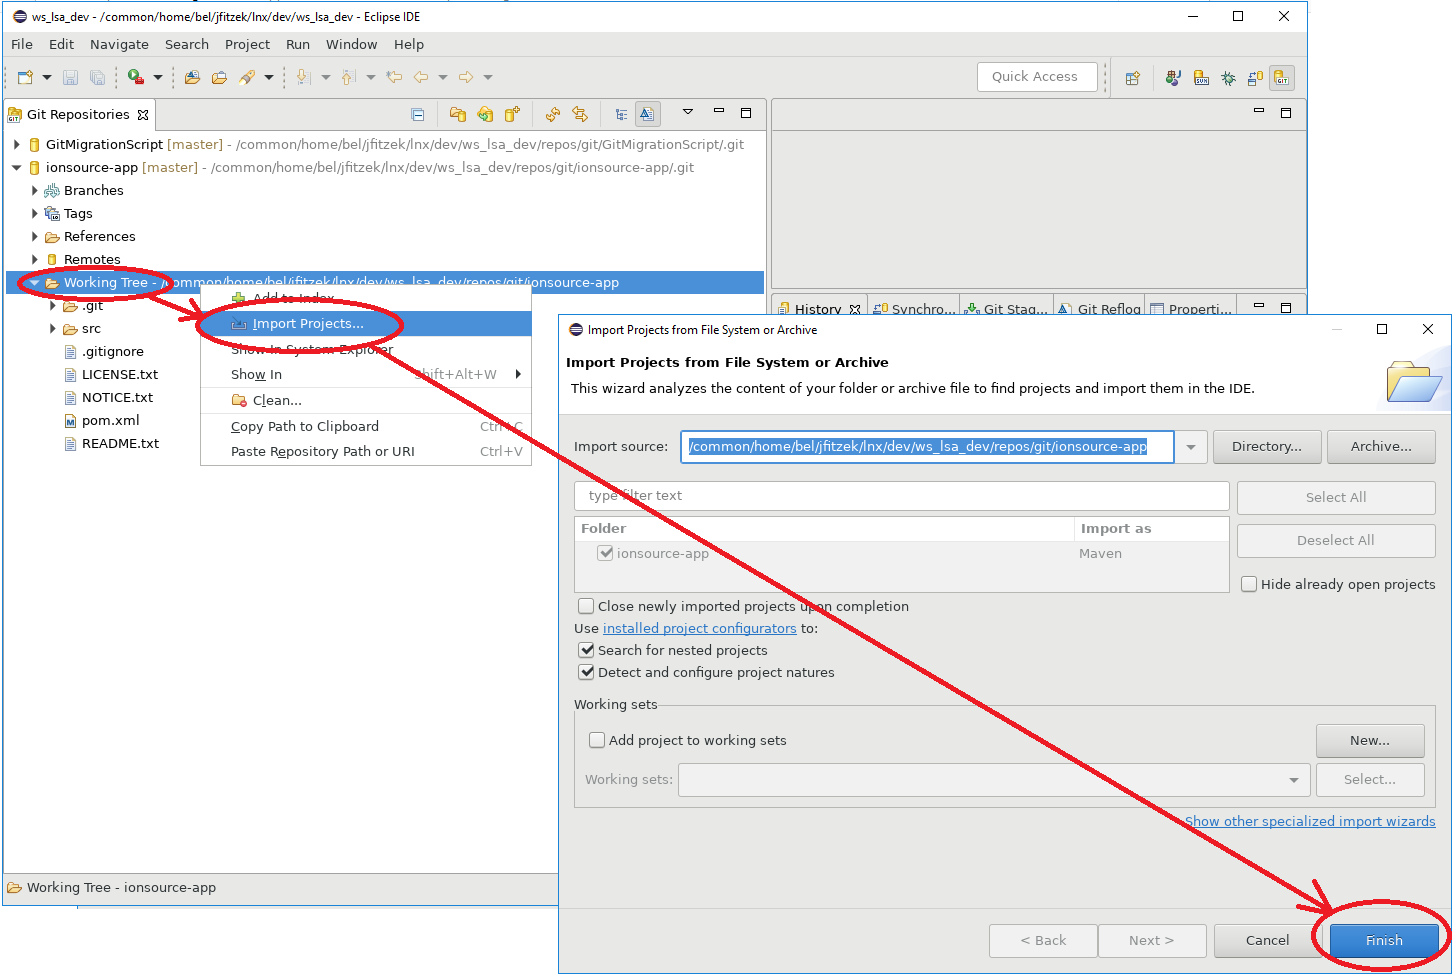
2.2 Importing the project
After cloning the repository, it resides in a directory called~/workspace-location/repos/git/repository-name and is available in the Git perspective within Eclipse.
3. Commit and Push local modifications
3.1 Preparation: compare your changes, add them to the staging area
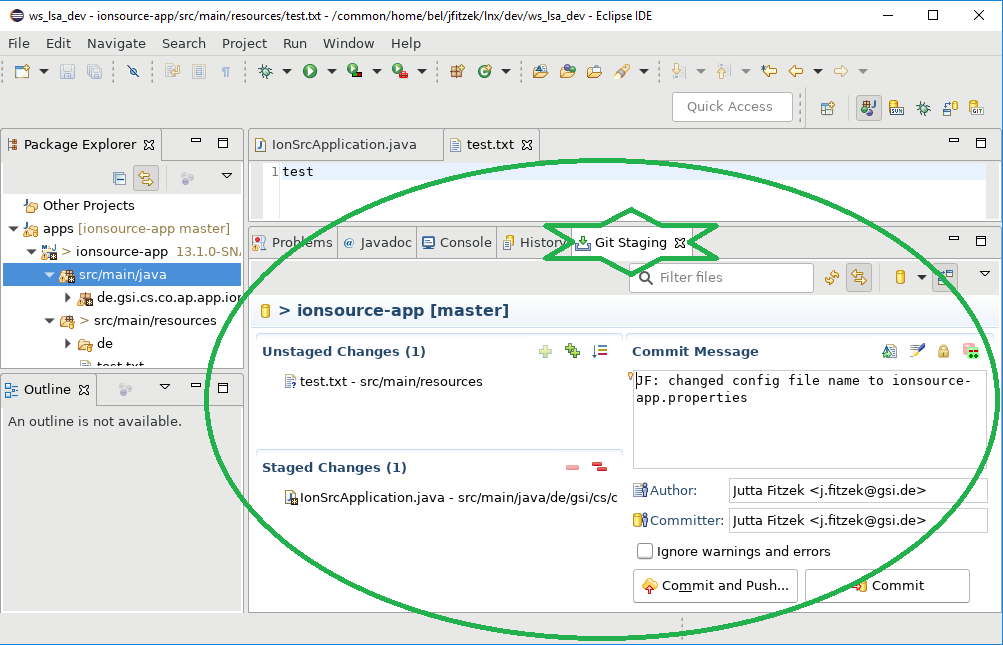
As before, the first step before committing your local modifications is to check them. Before with SVN we did this using the "Team Synchronizing" perspective with synchronize, now with Git we perform the comparison using the Staging View directly.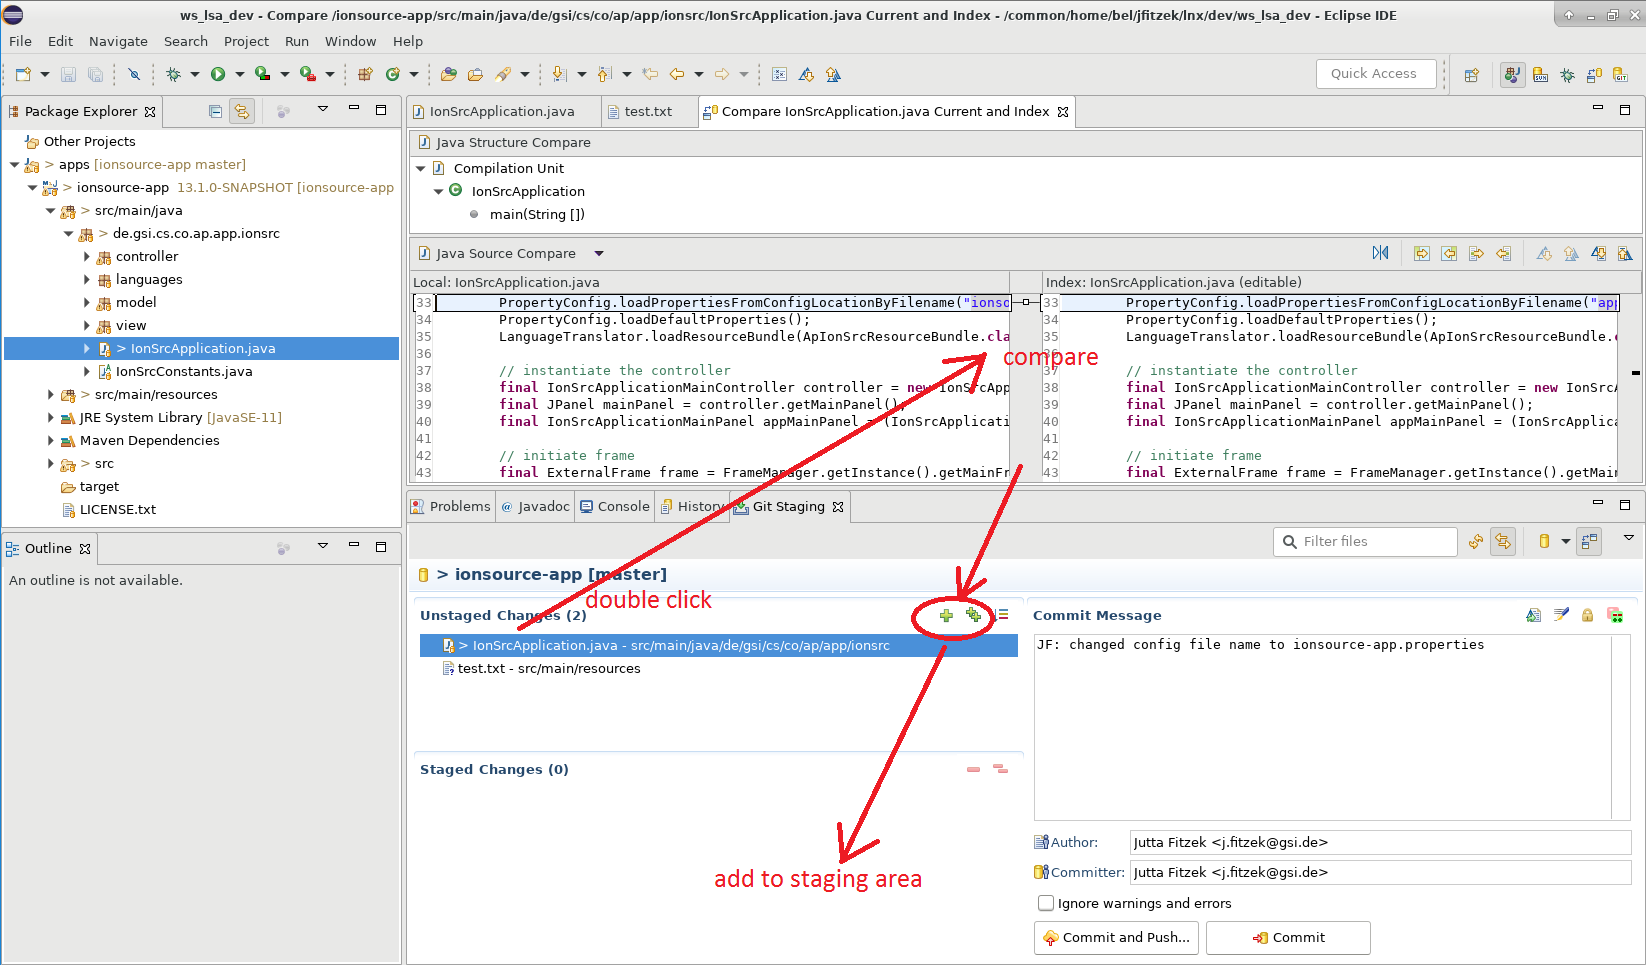 Changes in the Eclipse java project are changes to your local "working copy". They will not be committed, unless you to add the changed files explicitely to the "index" or "staging area".
This is done by adding those "unstaged changes" to the staging area using the greens arrows.
Changes in the Eclipse java project are changes to your local "working copy". They will not be committed, unless you to add the changed files explicitely to the "index" or "staging area".
This is done by adding those "unstaged changes" to the staging area using the greens arrows.
3.2 Commit to your local repository clone
After adding all the files you want to commit to the staging area, you commit your changes first to your local repository clone by calling commit. Afterward you have to push your commit to make it publicly available. Both steps can also be done in one go (e.g. for very small changes).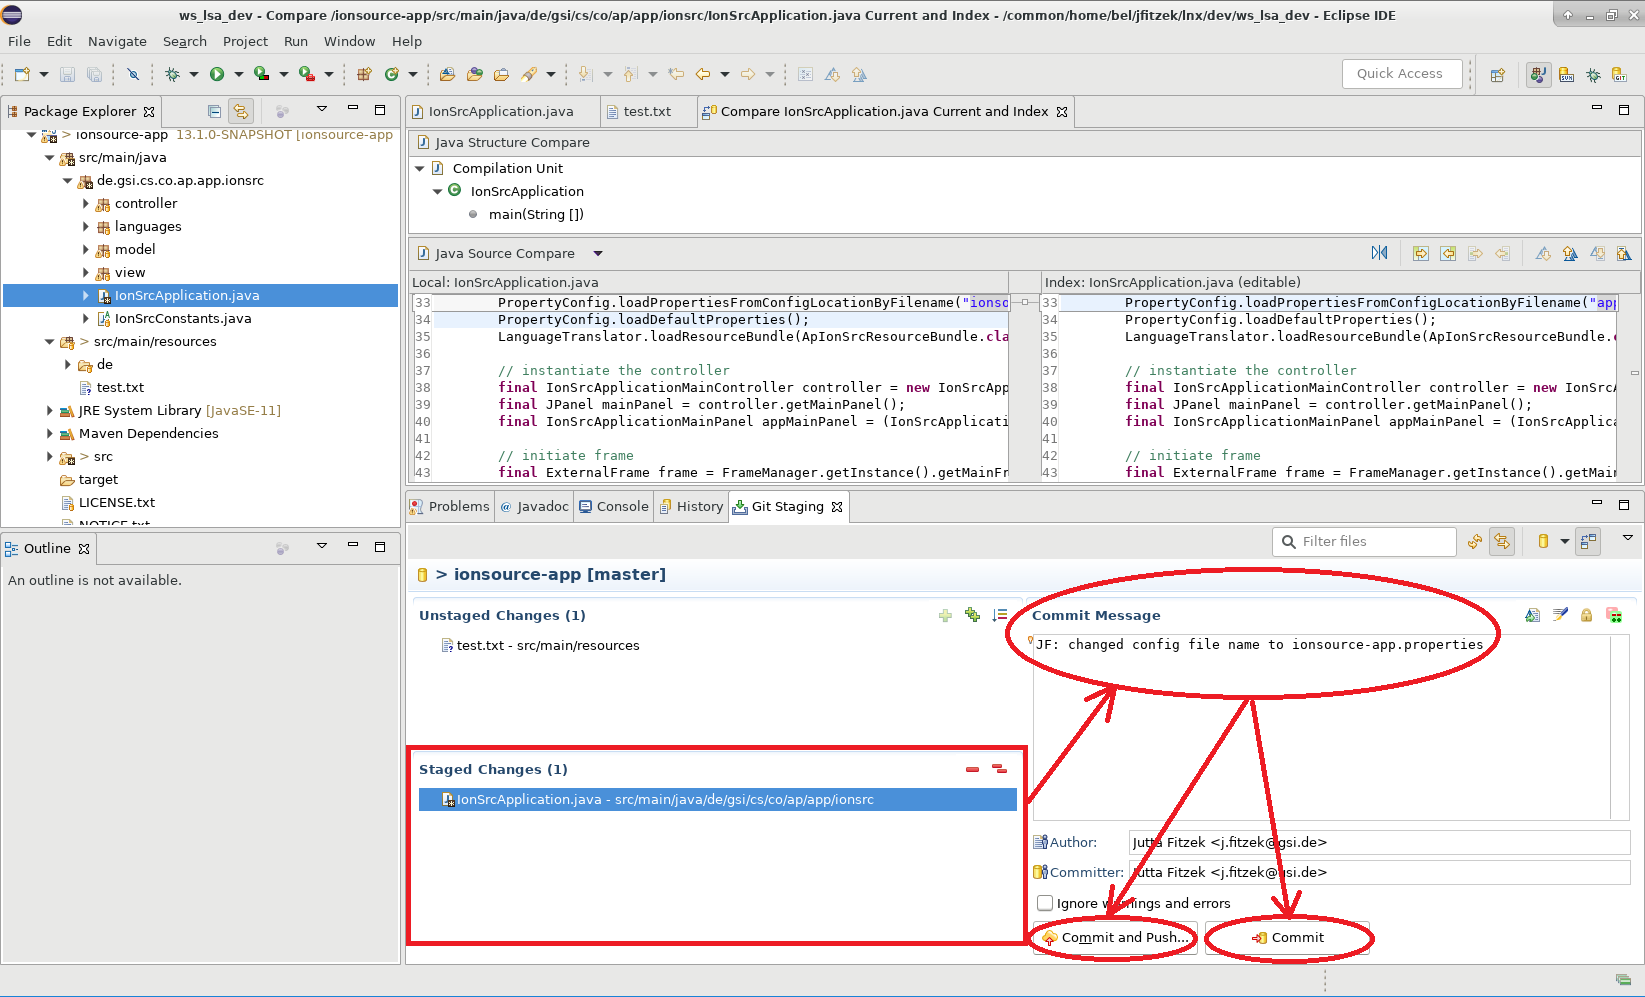 Commit messages:
If several changes are commited once it is a common practice to use the first line as a subject line, to leave the second line blank and then list the single change descriptions.
3.3 Push
If you have done several commits to your local repository clone, but have not pushed them yet to the public In the Java perspective:Right-click on the project -> Team -> Remote -> Push to Upstream
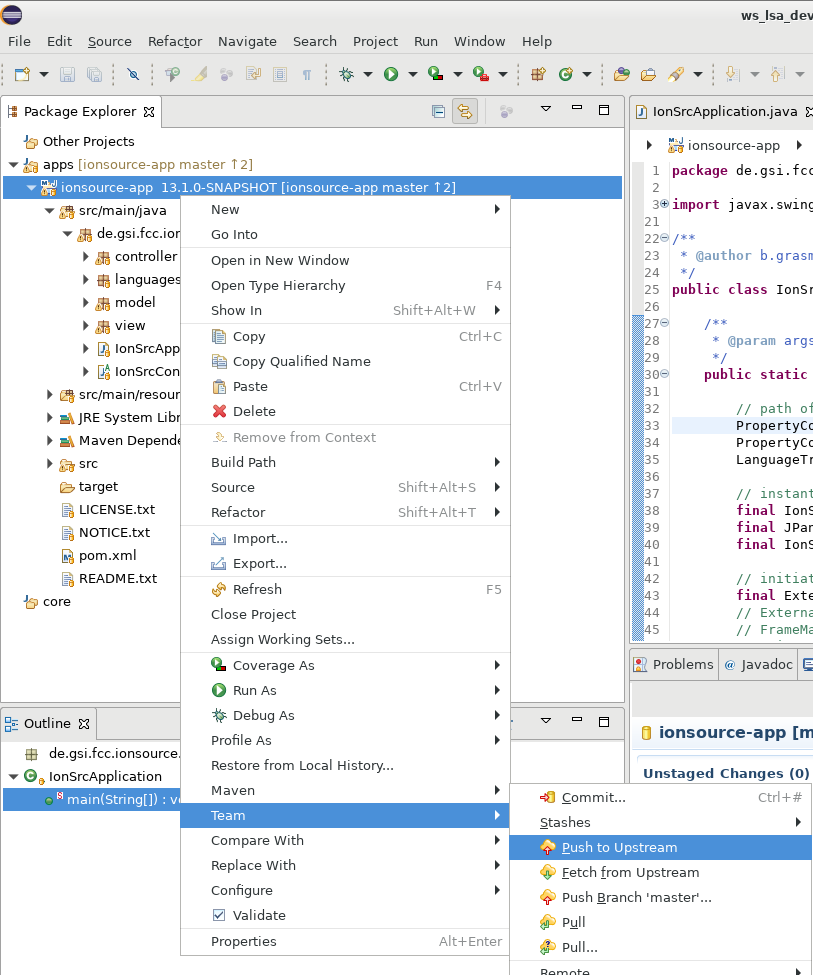 Or alternatively from the Git repositories view:
 Right-click the name of the repository clone -> Push to Upstream
4. Get remote updates
When colleagues have modified the code, you see this when executingRight mouse click -> Team -> Fetch, which will bring the changes only to your local repository clone.
If you have no local changes, then the easiest is to call Right mouse click -> Team -> Pull which will directly also update your working copy.
A more complicated example with both you and the colleague changed the code is described in the Git in Eclipse for Experts HowTo.
5. Create a release branch for an upcoming release
The release branch is created just like before, following the description of the release process, especially the section "release process for developers". Once the release branch has been created, you can ...6. Switch between branches
This section describes how to continue developing and temporarily switch to the latest release branch to fix a bug and perform a release. -- JuttaFitzek - 25 Jul 2019Edit | Attach | Print version | History: r15 < r14 < r13 < r12 | Backlinks | View wiki text | Edit wiki text | More topic actions
Topic revision: r15 - 12 Jan 2023, AndreasSchaller
Ideas, requests, problems regarding Foswiki? Send feedback