You are here: Foswiki>FESA Web>FESAclassDevelopmentSpecificEquipment>FESA-Class-Digitizer>SetupDigitizerServer (08 Nov 2023, AlexanderSchwinn)Edit Attach

Basic System Information
- The Mainboard is called Supermicro X11SSW-F (Verify that in the Bios Setting before uploading any new firmware !!)
- Information/manual/software/firmware regarding the board can be found on the supermicro webpage of that board.
Mounting the Hardware
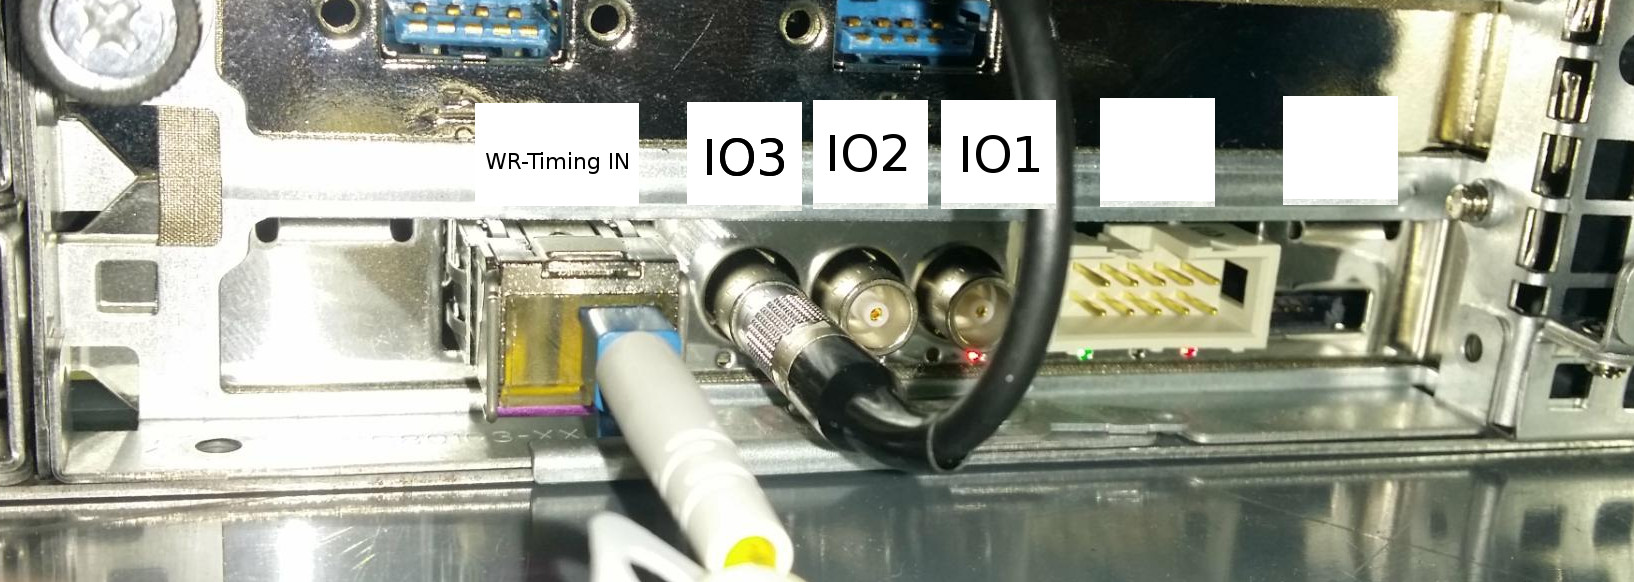
- Usually Someone from IN mounts the Pexaria card and connects the ethernet cables / the Pexaria LEMO .. here some details on that:
- The following two figures explain how-to install a PCIe card into a SuperMicro after the top cover has been removed.
 Please note that the Pexaria card must be registered by Timing, BEFORE it gets connected to the Timing Network !!
Management Port (IPMI)
- Name of Managenment Port always is either <FECNAME>i64 or <FECNAME>i
- If management port is not reachable after first boot, unplug + replug of RJ45 should help.
- Reboot/Shuitdown/Console can be used on this website: <FECNAME>i64.acc.gsi.de -- Ask Alexander Schwinn for Password
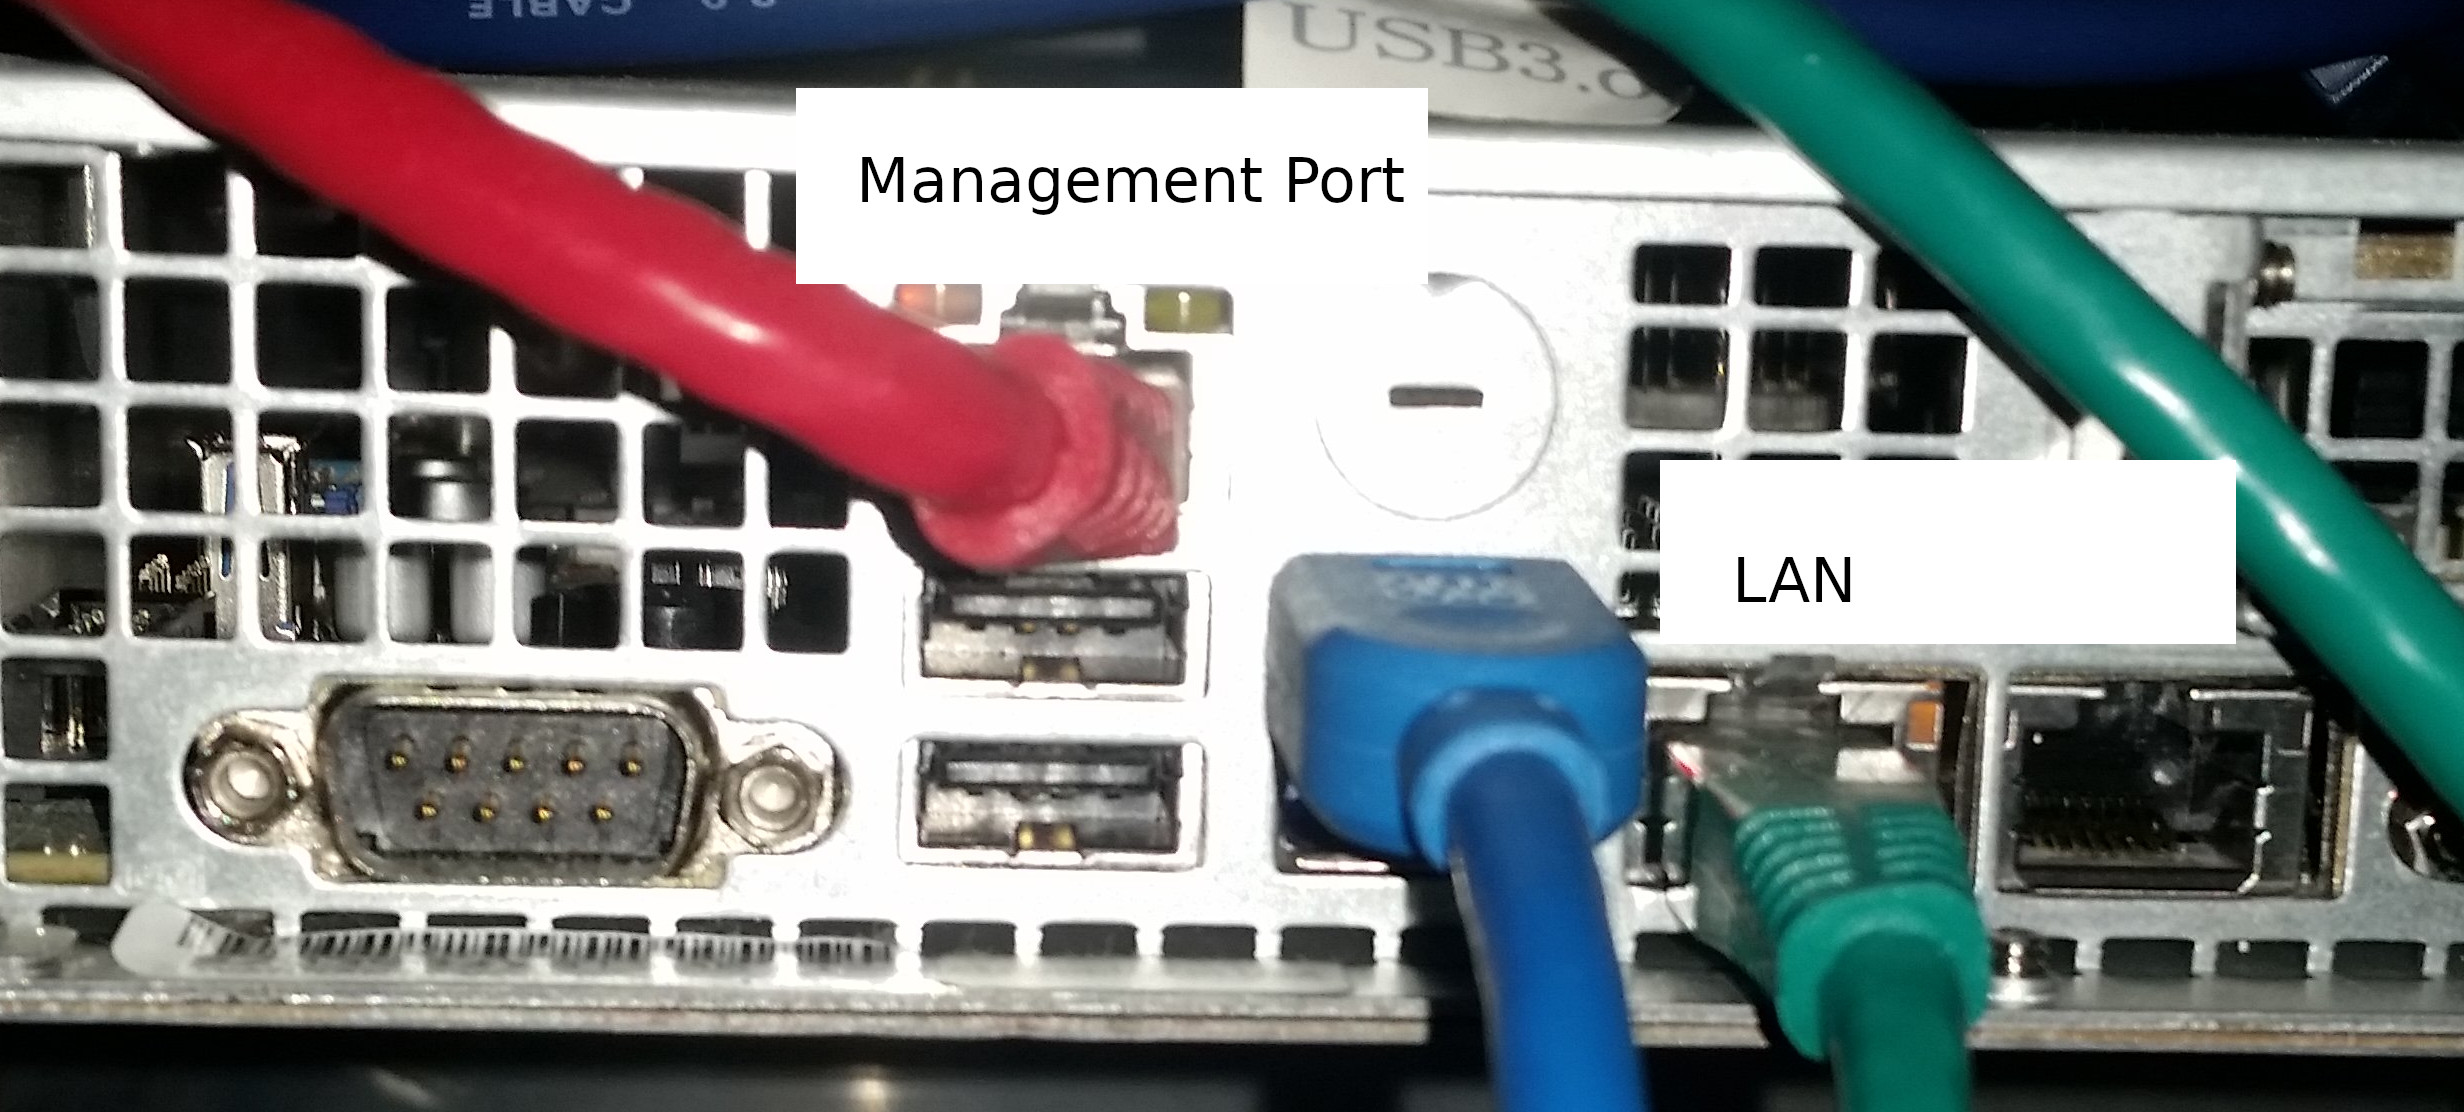
- Only the left ethernet port seems to work
- This one is the management Port:
 Figure: SuperMicro Ethernet ports.
 - Uhhh, its not quite as simple; when only one Ethernet port is connected the following will happen
-
LAN Interface 'Failover': all ports work as 'Management Port'; you can only reach the IPMI via <FECNAME>i64 (or <FECNAME>i) -
LAN Interface 'Dedicate': ports behave as indicated in the figure 'Management Port' above - thus, check (and configure) the desired behaviour via IPMI -> Configuration -> Network
-
 Figure: SuperMicro Ethernet port config.
 - You can modify or even factory reset the management software via IPMICFG-Linux.x86_64. (Installed at /common/export/fesa/local/dal004/IPMICFG_1.32.0_build.200910)
Booting via PXE (Ramdisk) and Flashing Gateware
- Attention! There is a "proadcast bug" with older Pexaria gateware (v4.0.0 and below), which potentially may lead to broadcasted garbage events on the timing network. Because of that, please emediatly flash a new gateware on it when the system is Powered On !
- execute "pxe-config <FEC> scuxl.doomsday" or "pxe-config <FEC> scuxl.enigma" to set the required symlinks to the correct Ramdisk)
- ". /common/usr/cscofe/scripts/accdefs"
- Setup required scripts:
- On asl cluster: mkdir /common/export/nfsinit/<FEC>
- Here the required init scripts for a Digitizer FEC (v. alpha8):
02_digitizer_optimization_supermicro -> ../global/digitizer_optimization_supermicro
20_timing-rte -> ../global/timing-rte-tg-doomsday-v4.0.5
50_fesa -> ../global/fesa_64bit_pro_environment
01_digitizer-alpha8 -> ../global/digitizer-alpha8
- reboot the system to load the correct ramdisk (e.g. via the management port)
- Flash the correct gateware to the Pexaria: https://www-acc.gsi.de/wiki/Main/CheckAndFlashTimingReceiverFirmware
- Optionally open bios and to set "resume to latest powerstate after power loss". (Default is to stay off after there was a power loss)
Installing Digitizer Fesa Software
Attention: FesaEclipsePlugin required !- Checkout and build (validate, codegen, make) DigitizerClass2 and DigitizerDU2
- When DigitizerDU2.deploy is open, press "add FEC", clone an existing FEC (attention: possibly required to first fix instance file)
- Do required changes in new instance file (rename Fesa Device, *.grc filepath, Trigger Events)
- Copy flowgraph (*.grc) file from existing FEC to new folder and modify flowgraph according to what is requested (E.g. naming of channels, etc.)
- Commit changes to git
- Press "Launch FESA explorer" on the instance to get a *.zip which can be used by FEX
- On the instance file, press "export FESA instance to Database" to be able to access the new device via Japc (Check on this website that it is in: https://websvcpro.acc.gsi.de/groups/cscosv/fesaweb/index.html (only works on asl cluster))
- When DigitizerDU2.deploy is open, press "release", pick "inUse" .. actually thats only required to create all folders relevantr for FESA
- Execute "scripts/releaseDigitizer.sh" to do the actual release (Execute it with -h first) ... that will copy the *.grc file besides other stuff
BIOS/IPMI(BMC) Firmware Upgrade
- Tested for Board Supermicro X11SSW-F, with IPMI 3.64 --> 4.04 and BIOS 2.0c --> 2.8a
- Note that if IPMI/BIOS firmware upgrade fails, that can brick your device, so only do so if there is strong need, and be very careful
- Make sure to store all IPMI/BIOS settings, since a transition of the old settings will not be possible. Manual reconfiguration will be required
- Make sure to download the correct IPMI (BMC) and BIOS firmware for your board from the supermicro webpage of that board.
- The concrete board ID can be checked on the 'main' page in the bios settings.
- You current IPMI/BIOS version can be checked on the page 'system' in the IPMI webinterface
- It is IMPORTANT to first upgrade the IPMI firmware and only afterwards upgrade the BIOS firmware!
- IPMI Firmware Upgrade
- Unzip both archives you downloaded. The IPMI firmware ships some pdf's with it. READ THEM CAREFULLY!!
- Upload the IPMI binary via the web interface. ... it's the file with the *.bin ending.
- During IPMI upgrade, as noted in the pdf, uncheck all checkboxes which are about reserving configuration. NOT DOING SO MIGHT BRICK YOUR IPMI.
- Flash the new IPMI. Be patient and don't interrupt the process ! Afterwards a reboot will be triggered.
- Default login is ADMIN/ADMIN Directly change that after you logged in
- Configure the new IPMI settings, according to the previous configuration
- BIOS Firmware upgrade
- In order to upgrade the BIOS firmware via the IPMI web interface, you need to have a Supermicro IPMI License-Key for that server
- Don't generate a key on your own with this command:
echo -n 'bmc-mac' | xxd -r -p | openssl dgst -sha1 -mac HMAC -macopt hexkey:8544E3B47ECA58F9583043F8 | awk '{print $2}' | cut -c 1-24 - Instead, register on the supermiscro webpage and buy a license for ~30$ per system!
- Don't generate a key on your own with this command:
- Make sure to exit BIOS before you do the upgrade
- Upload the new BIOS firmware via the new IPMI webinterface (The biggest file after unzip ... should be ~16MB)
- Flash the new BIOS. Be patient and don't interrupt the process ! Afterwards a reboot will be triggered.
- If you see a black screen during boot via iKVM/HTML5 monitoring, then choose PowerControl --> Set Power Off and afterwars, PowerControl --> Set Power On.
- Press 'del' on the virtual keyboard to enter the new Bios
- Configure the new BIOS settings, according to the previous configuration
- In order to upgrade the BIOS firmware via the IPMI web interface, you need to have a Supermicro IPMI License-Key for that server
- If you reach this step: Congratulations, you are done!
Known Bugs
- When using a PCIE-USB Extension Card, the system only reboots when the boot is watched via IPMI
- This bug can be prevented by disabling legacy USB support in the BIOS:
Advanced --> USB Configuration --> Legacy USB Support
- For more info, here is the related issue: https://gitlab.com/al.schwinn/DigitizerClass2/-/issues/136
- This bug can be prevented by disabling legacy USB support in the BIOS:
| I |
Attachment | Action | Size | Date | Who | Comment |
|---|---|---|---|---|---|---|
| |
PHOTO_20191108_105725.jpg | manage | 41 K | 07 Aug 2020 - 08:17 | AlexanderSchwinn | Picoscope Front (dal024) |
| |
PHOTO_20191108_151243.jpg | manage | 483 K | 08 Nov 2019 - 14:43 | AlexanderSchwinn | Which on is the Management Port? |
| |
Pexaria.jpg | manage | 228 K | 30 May 2018 - 08:00 | AlexanderSchwinn | pexaria card |
| |
superMicroPcie1.JPG | manage | 307 K | 25 Nov 2019 - 15:54 | DietrichBeck | mount PCIe board I |
| |
superMicroPcie2.JPG | manage | 336 K | 25 Nov 2019 - 15:54 | DietrichBeck | mount PCIe board II |
| |
networkConfig.png | manage | 9 K | 16 Nov 2021 - 15:34 | DietrichBeck | port config |
Edit | Attach | Print version | History: r18 < r17 < r16 < r15 | Backlinks | View wiki text | Edit wiki text | More topic actions
Topic revision: r18 - 08 Nov 2023, AlexanderSchwinn
 Copyright © by the contributing authors. All material on this collaboration platform is the property of the contributing authors.
 Ideas, requests, problems regarding Foswiki? Send feedback


