You are here: Foswiki>FESA Web>HowTo>StepByStep>StepByStepDesign (18 Mar 2009, HaraldBraeuning)Edit Attach
-- HaraldBraeuning - 18 Mar 2009
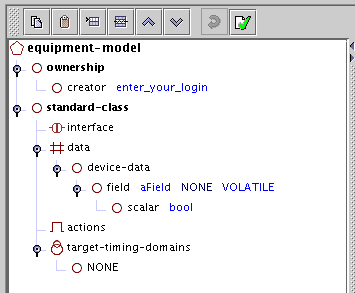
 A dialog will appear, where you can select a template fpr the new class. You can select emptyTemplate, as missing fields can always be added later on. The image below shows the resulting empty class.
 The absolutly first step is to enter a valid user id with access to the Fesa database in the creator field. Not all valid GSI user id's have this access. fesauser is a good user id. Otherwise you may not be able to access your Fesa class anymore. To enter the user id, click on the creator field. A entry panel with an entry field will appear on the right. Enter the user id and press #Return# or #Tab# to accept the entry.
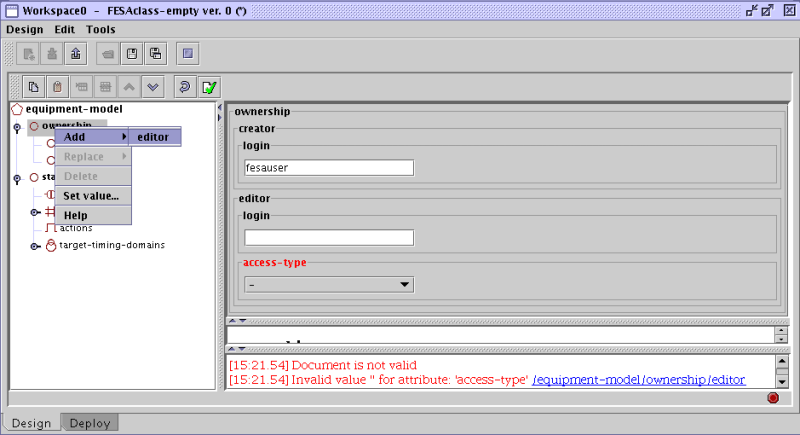
You can also specify other people by their user id as editors. To do this, highlight the ownership field by clicking on it. A right mouse click will now open a popup panel. Select Add / editor and fill in the new entry fields with the editors user id and access rights.
 If the name of a field is shown in read, as in the above picture, this field is missing a mandatory input in order for the design to by valid. A invalid design is indicated by a red stop sign in the lower right corner of the workspace window. A green check sign indicates a valid design. The button with the white sheet of paper and the green checksign in the toolbar can be used to check the validity of the document and also gives hints about the problems.
Note: A invalid design cannot be stored in the data base.
Designing the Fesa Class
Creating an empty design
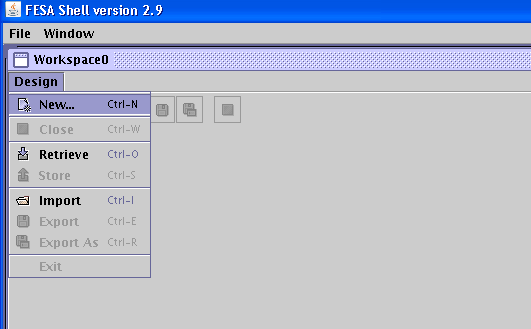
The first step is to design the Fesa class using the Designer tool. Instead of running the tool stand-alone, it is easier to run the Fesa shell. The design tool is the first (left most) tab in the shell:- Logon to asl715 (or asl713) as fesauser
- Change to the work directory: cd fesawork
- Run the Fesa shell: runfesamodeller (Note: on asl713, this will block the terminal. Append an ampersand & to avoid this).
 A dialog will appear, where you can select a template fpr the new class. You can select emptyTemplate, as missing fields can always be added later on. The image below shows the resulting empty class.
 The absolutly first step is to enter a valid user id with access to the Fesa database in the creator field. Not all valid GSI user id's have this access. fesauser is a good user id. Otherwise you may not be able to access your Fesa class anymore. To enter the user id, click on the creator field. A entry panel with an entry field will appear on the right. Enter the user id and press #Return# or #Tab# to accept the entry.
You can also specify other people by their user id as editors. To do this, highlight the ownership field by clicking on it. A right mouse click will now open a popup panel. Select Add / editor and fill in the new entry fields with the editors user id and access rights.
 If the name of a field is shown in read, as in the above picture, this field is missing a mandatory input in order for the design to by valid. A invalid design is indicated by a red stop sign in the lower right corner of the workspace window. A green check sign indicates a valid design. The button with the white sheet of paper and the green checksign in the toolbar can be used to check the validity of the document and also gives hints about the problems.
Note: A invalid design cannot be stored in the data base.
| I | Attachment | Action | Size | Date | Who | Comment |
|---|---|---|---|---|---|---|
| |
StepByStep1.png | manage | 7 K | 18 Mar 2009 - 13:59 | HaraldBraeuning | Create a new design |
| |
StepByStep2.png | manage | 6 K | 18 Mar 2009 - 14:25 | HaraldBraeuning | An emtpy design |
| |
StepByStep3.png | manage | 63 K | 18 Mar 2009 - 14:29 | HaraldBraeuning | An invalid design |
Edit | Attach | Print version | History: r2 < r1 | Backlinks | View wiki text | Edit wiki text | More topic actions
Topic revision: r2 - 18 Mar 2009, HaraldBraeuning
 Copyright © by the contributing authors. All material on this collaboration platform is the property of the contributing authors.
 Ideas, requests, problems regarding Foswiki? Send feedback


