|
|
You are here: Foswiki>Applications Web>AppOnCallDutyMain>AppOnCallDutySystemAccessRemoteDesktopWindows (25 Jan 2021, JuttaFitzek)Edit Attach
Remote Desktop using Putty for SSH Tunnel under Windows
Download and Install Putty
Putty can be downloaded here, e.g. Package files -> MSI (‘Windows Installer’) -> 64Bit Please download and install it.Configure Putty
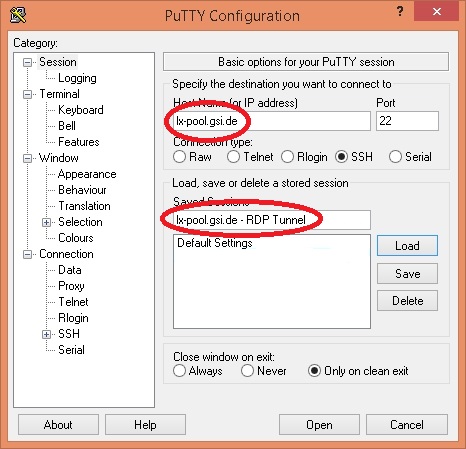
Start Putty and configure a new connection. On the main page, please configure host and the connection descritpion:lx-pool.gsi.de as host lx-pool.gsi.de - RDP Tunnel choose any description, it helps adding "Tunnel", so that you know it is for tunneling
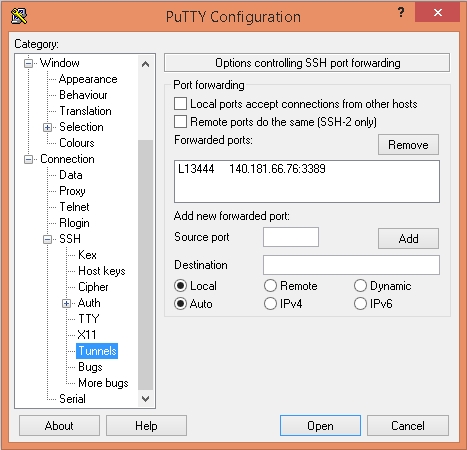
Navigate on the left side in the tree to Connection->SSH->Tunnels and enter a source port on your local maschine, as well as your office PCs' IP with RDP port 3389 as shown below:
13444                     Source port: some arbritrary unused source port on your local computer, e.g. 13444
140.181.66.67:3389        Destination: replace 140.181.66.67 with your office PC's IP address and the Remote Destop port 3389
After pressing "add" on the right side, your ssh tunnel config should look like this:
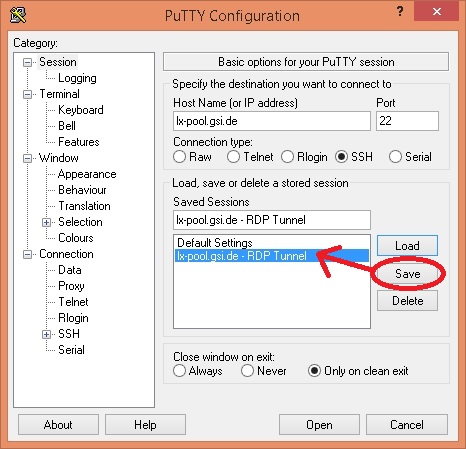
 Please navigate back to the main page of putty configuration (already shown on the first page) and save your configuarion by pressing "Save".
Then your new configuration should appear in the list of saved configurations.
Please navigate back to the main page of putty configuration (already shown on the first page) and save your configuarion by pressing "Save".
Then your new configuration should appear in the list of saved configurations.
Opening the Tunnel and Remote Desktop Login for the first time
- Start Putty (if not already running) and choose your tunnel configuration by selecting it in the list. "load" your tunnel config and "open" it, then please log on the lx-pool using your GSI Linux account. If that works fine, please continue.
(If you forgot your GSI Linux passwort, please request a password reset by calling the User Help Desk (Tel. 2515).) - Start Remote Desktop e.g. by clicking on the Windows Icon on the left lower corner of your Windows Screen and enter mstsc When using remote desktop for the first time, please fill out Computer and User name as shown below:
127.0.0.1:13444         localhost plus the local port, that you have chosen above, e.g. 13444
CAMPUS\myuser           CAMPUS domain, backslash, your Windows username
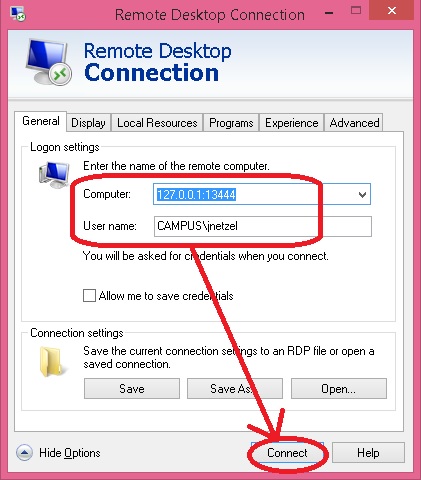 Then press connect and if prompted, please enter your Windows Username.
Hopefully everything works as expected!
If you get some errors, please be sure to enable remote desktop access by following these instructions.
Then press connect and if prompted, please enter your Windows Username.
Hopefully everything works as expected!
If you get some errors, please be sure to enable remote desktop access by following these instructions.
Create Desktop Icon for Putty and Remote Desktop
Of course you could always start Putty, "load" your tunnel config and "open" it, open Remote Desktop using Windows Key -> "mstsc" etc. but right from the start, we would like nice desktop icons for it, like this:"C:\Program Files\PuTTY\putty.exe" -load "lx-pool.gsi.de - RDP Tunnel" -ssh -l jnetzel"
Trouble Shooting during use
- Copy & Paste not working any more (though it worked fine before): on the target windows machine, kill the Remote Desktop Clipboard process (rdpclip.exe) and restart it.
Edit | Attach | Print version | History: r2 < r1 | Backlinks | View wiki text | Edit wiki text | More topic actions
Topic revision: r2 - 25 Jan 2021, JuttaFitzek
Ideas, requests, problems regarding Foswiki? Send feedback